

Set up your hospital profile and departments, then follow each patient from the front desk and OPD through admission, ward care, lab, pharmacy and certificates to discharge and the final bill.
In this guide 10 sections
This guide walks owners, managers and staff of hospitals through every step, using the real screens of the Hospify Pro hospital demo. You can follow along in the live hospital demo without signing up.
Who this is for: hospitals. What you need: a computer or tablet with a browser and a printer for bills, reports and certificates.
Part 1: Set up your hospital
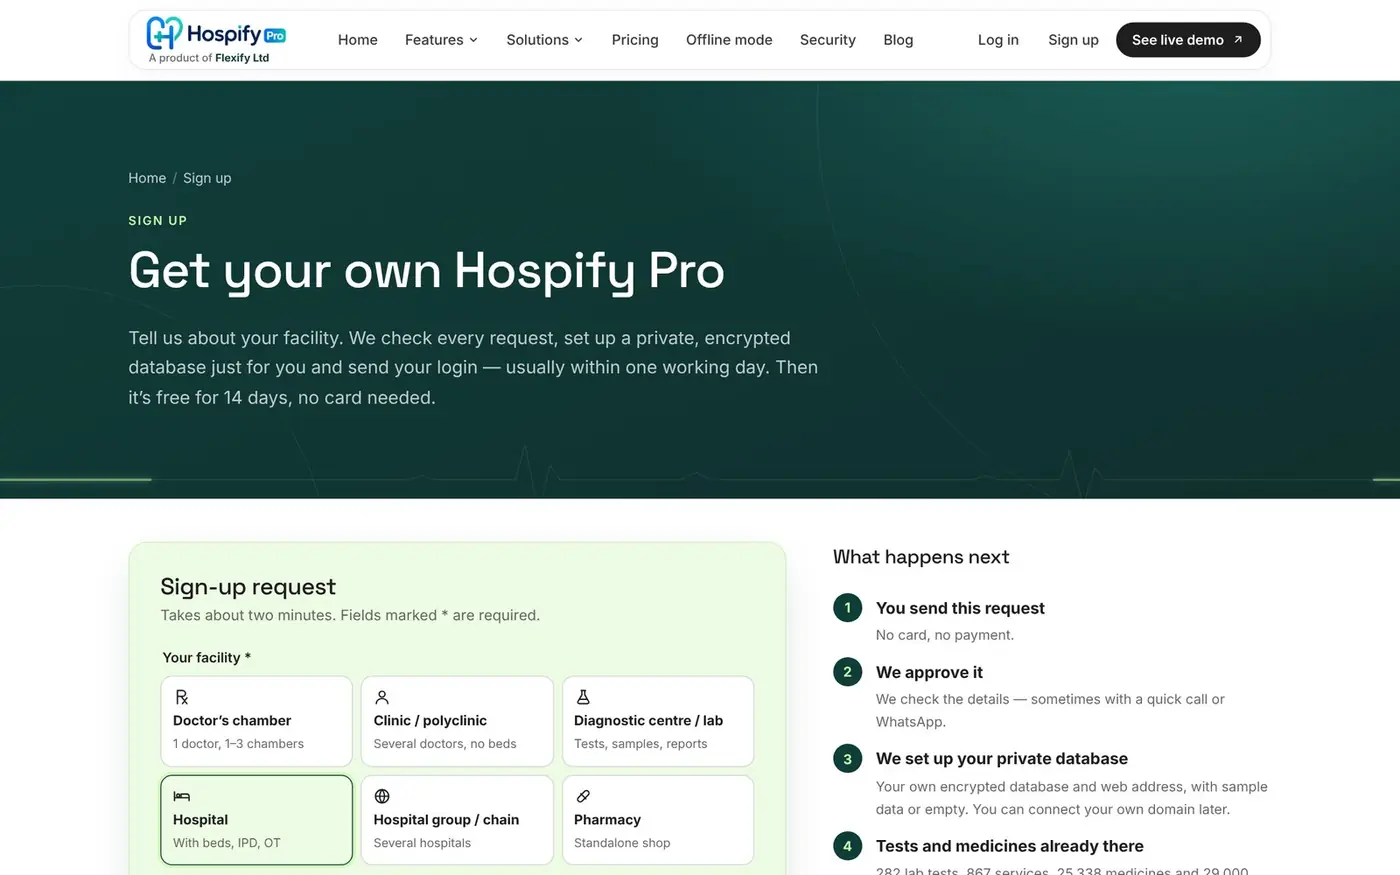
Step 1: Send a sign-up request
First, go to hospify dot pro, slash signup. Choose Hospital, then fill in your name, phone, email and the web address you want. The team sets up your private database and sends your login, usually within one working day. The first fourteen days are free.
- hospify.pro/signup
- Choose Hospital
- 14 days free · no card
Step 2: Name, logo and print header
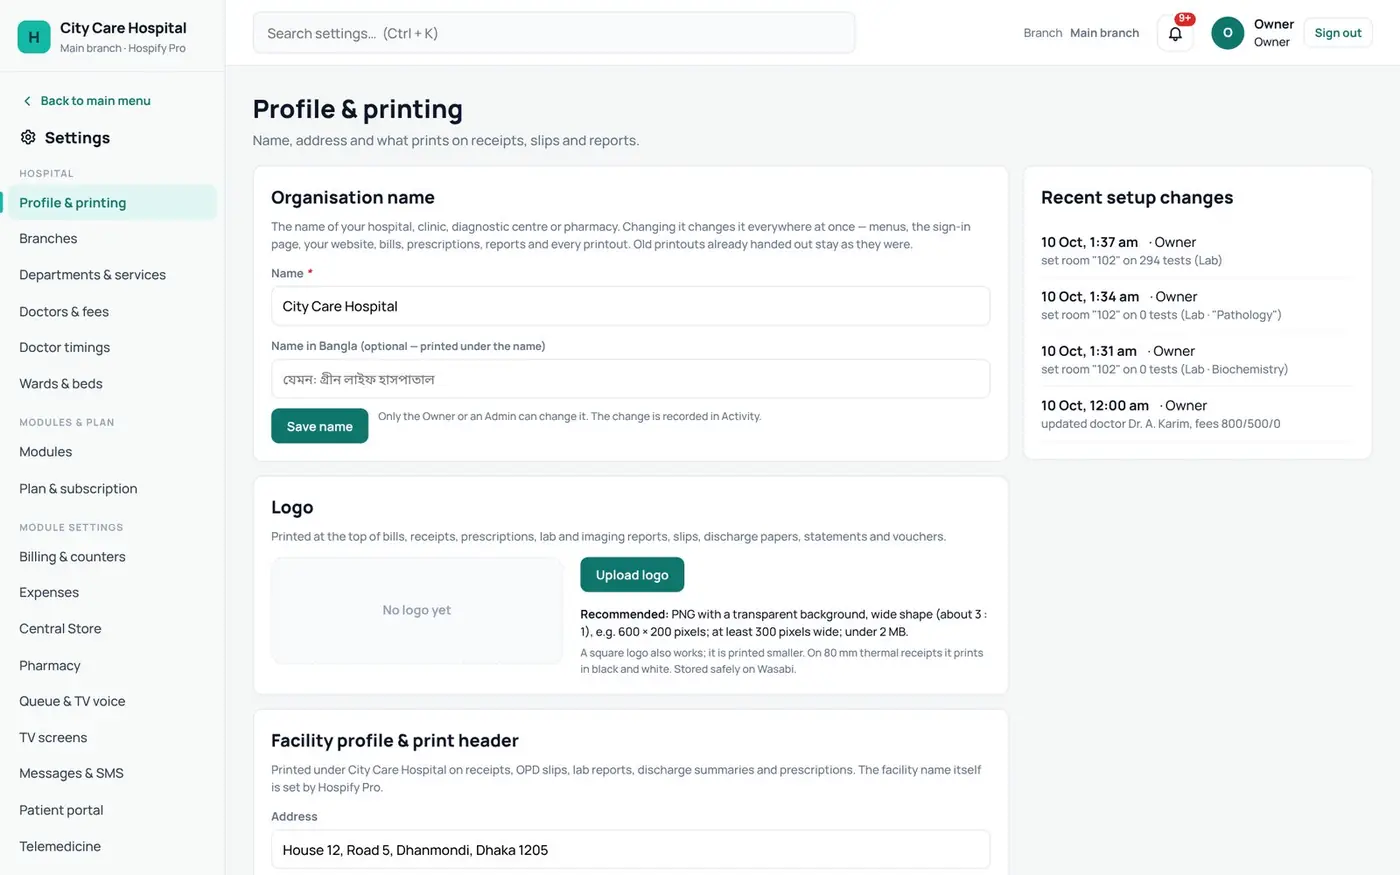
Open Settings, then Profile and printing. Add your hospital’s name, logo, address and licence line. They print on every bill, report and certificate.
- Settings → Profile & printing
- Logo · address · DGHS licence
- Prints on every document
Step 3: Doctors and departments
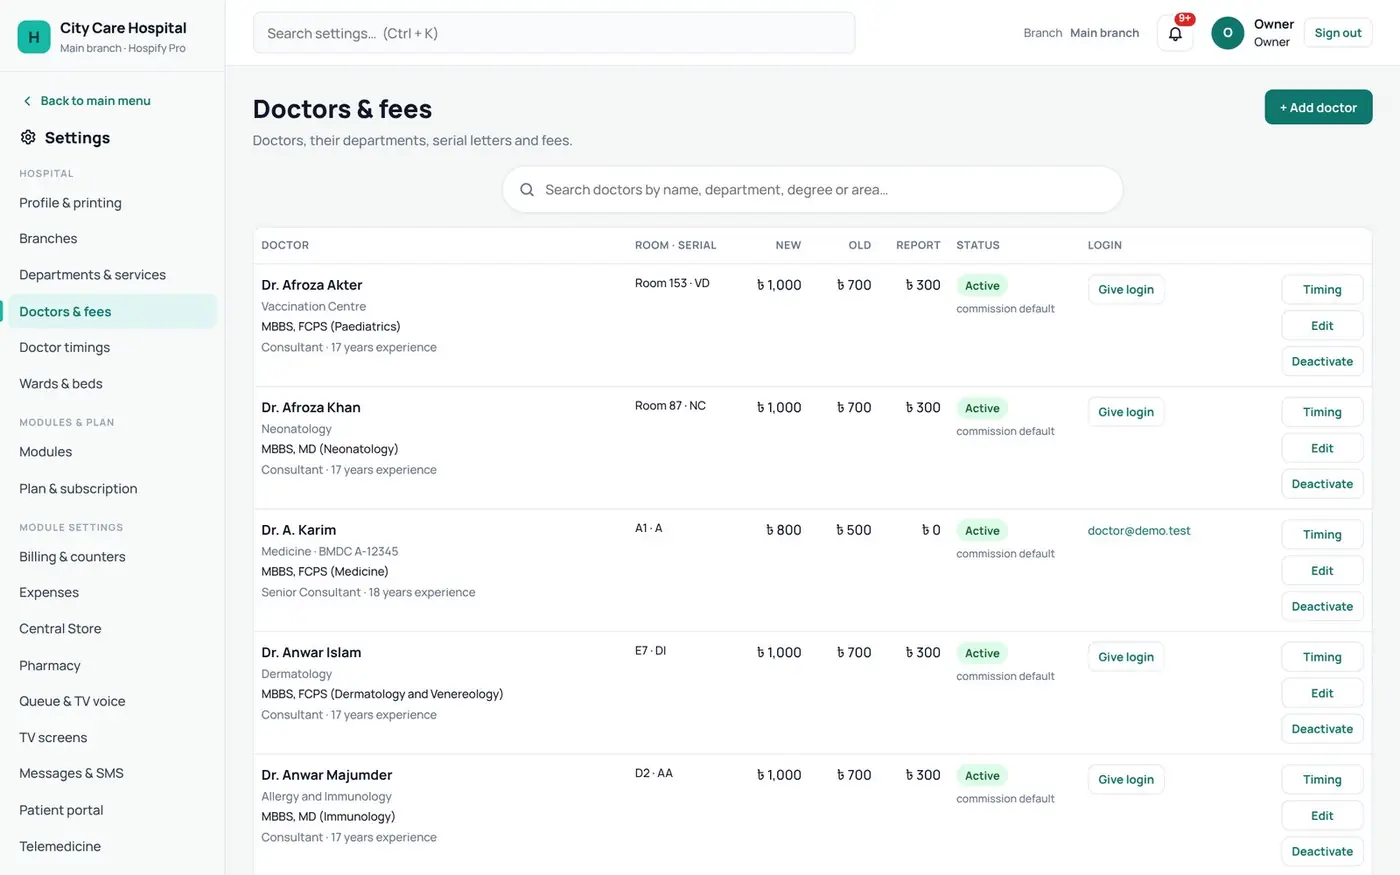
In Doctors and fees, add each consultant with their department, room, serial letter and fees, and give them a login so they see their own queue.
- Settings → Doctors & fees
- Room · serial letter · fees
- Give each doctor a login
Step 4: Staff logins and roles
In Users and roles, add every staff member with the right role: receptionist, cashier, doctor, nurse, lab, pharmacist or accountant.
- Settings → Users & roles
- Doctor · Nurse · Lab · Cashier…
- Each role sees its own screens

Step 5: Where patients pay
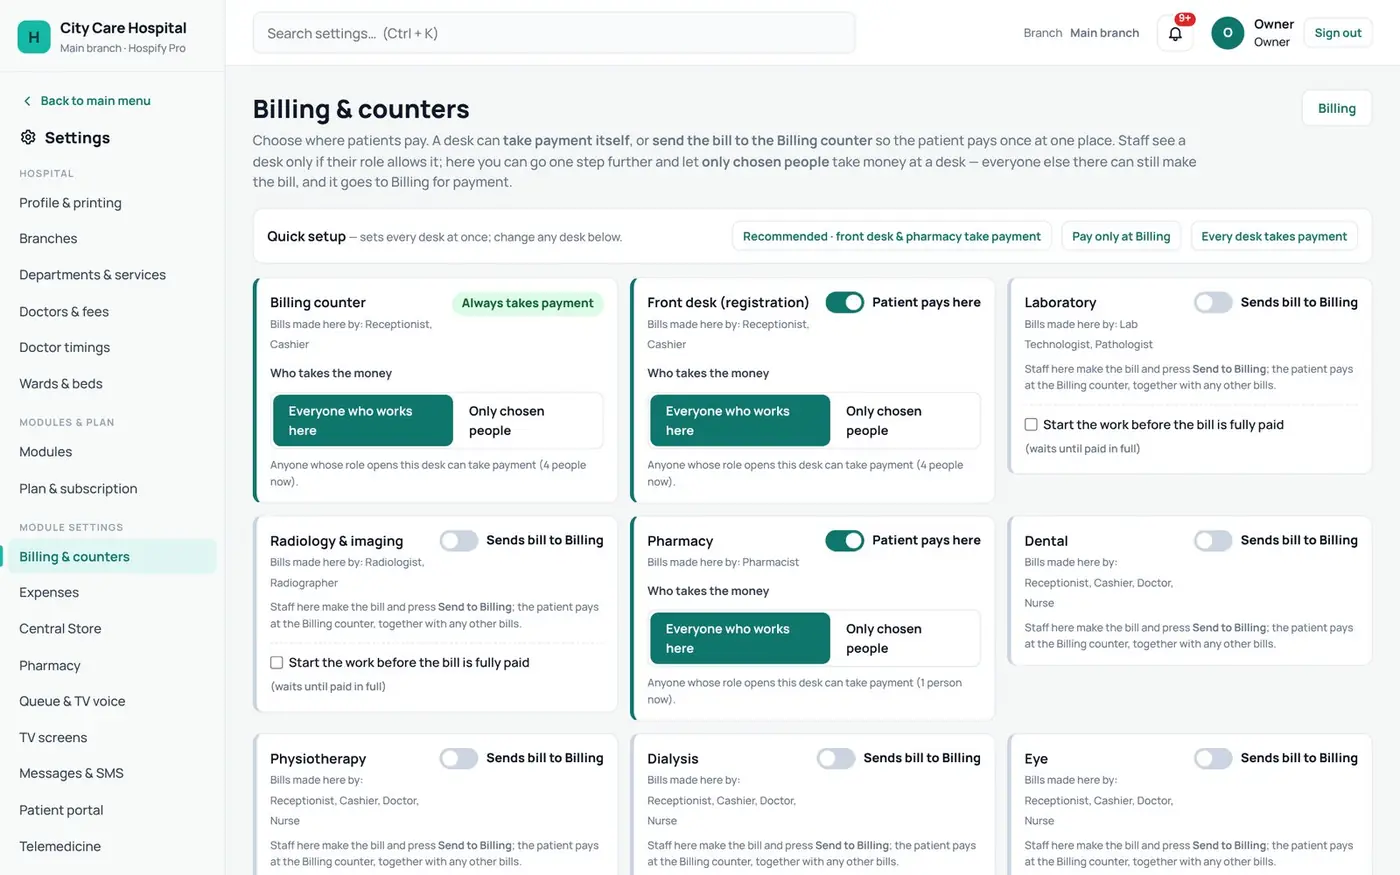
In Billing and counters, decide where patients pay. Departments that don’t take money send their bills to the billing counter, so the patient pays once.
- Settings → Billing & counters
- Front desk & pharmacy take payment
- Wards send charges to one bill
Part 2: Front desk and OPD
Step 6: Register and bill
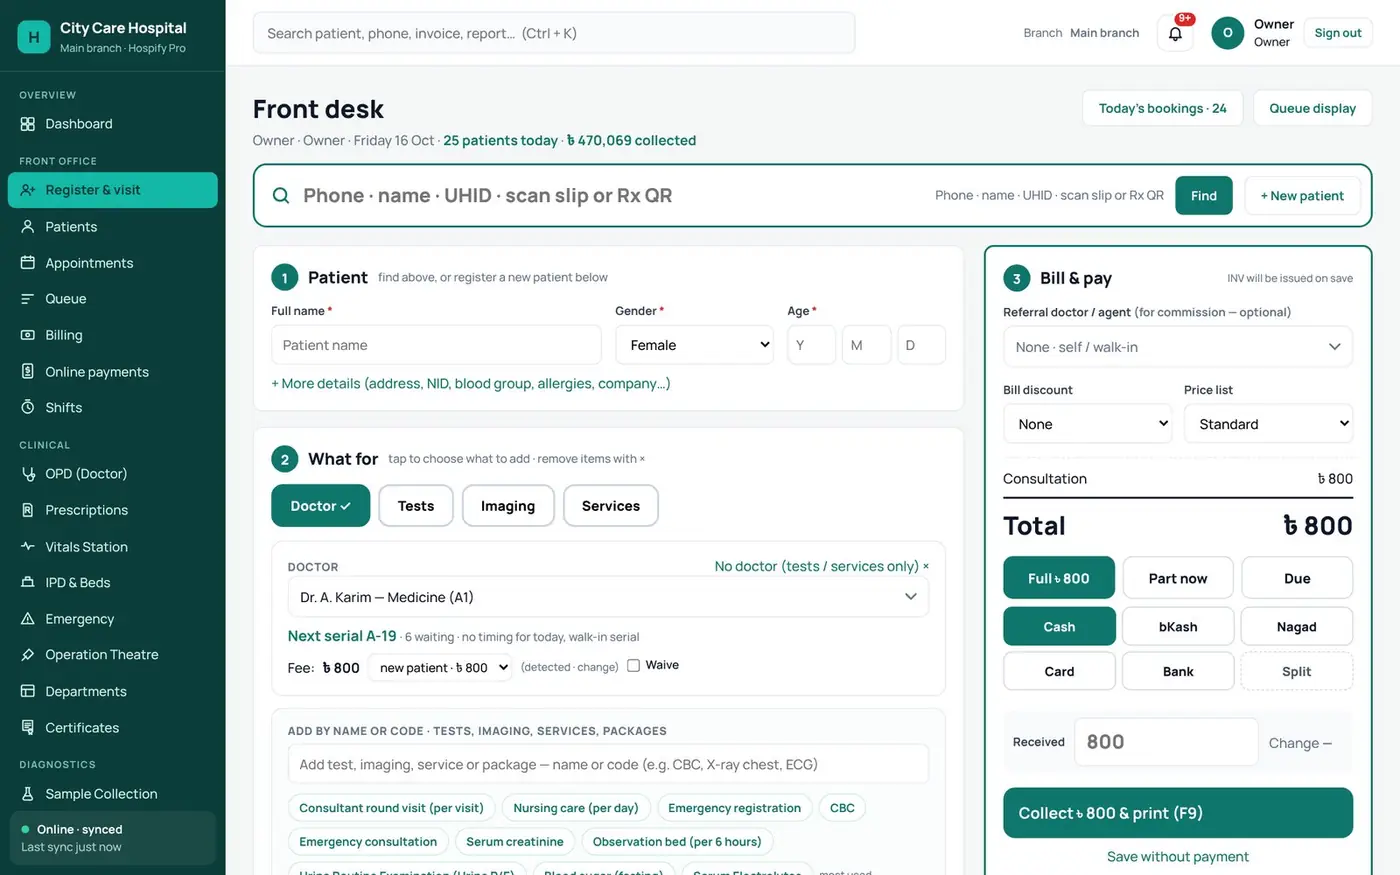
At the front desk, search by phone first, then register a new patient with name, gender and age. Add the doctor’s fee and any tests to one bill, and take payment.
- Search by phone first
- Doctor fee and tests on one bill
- Cash · bKash · card
Step 7: The money receipt
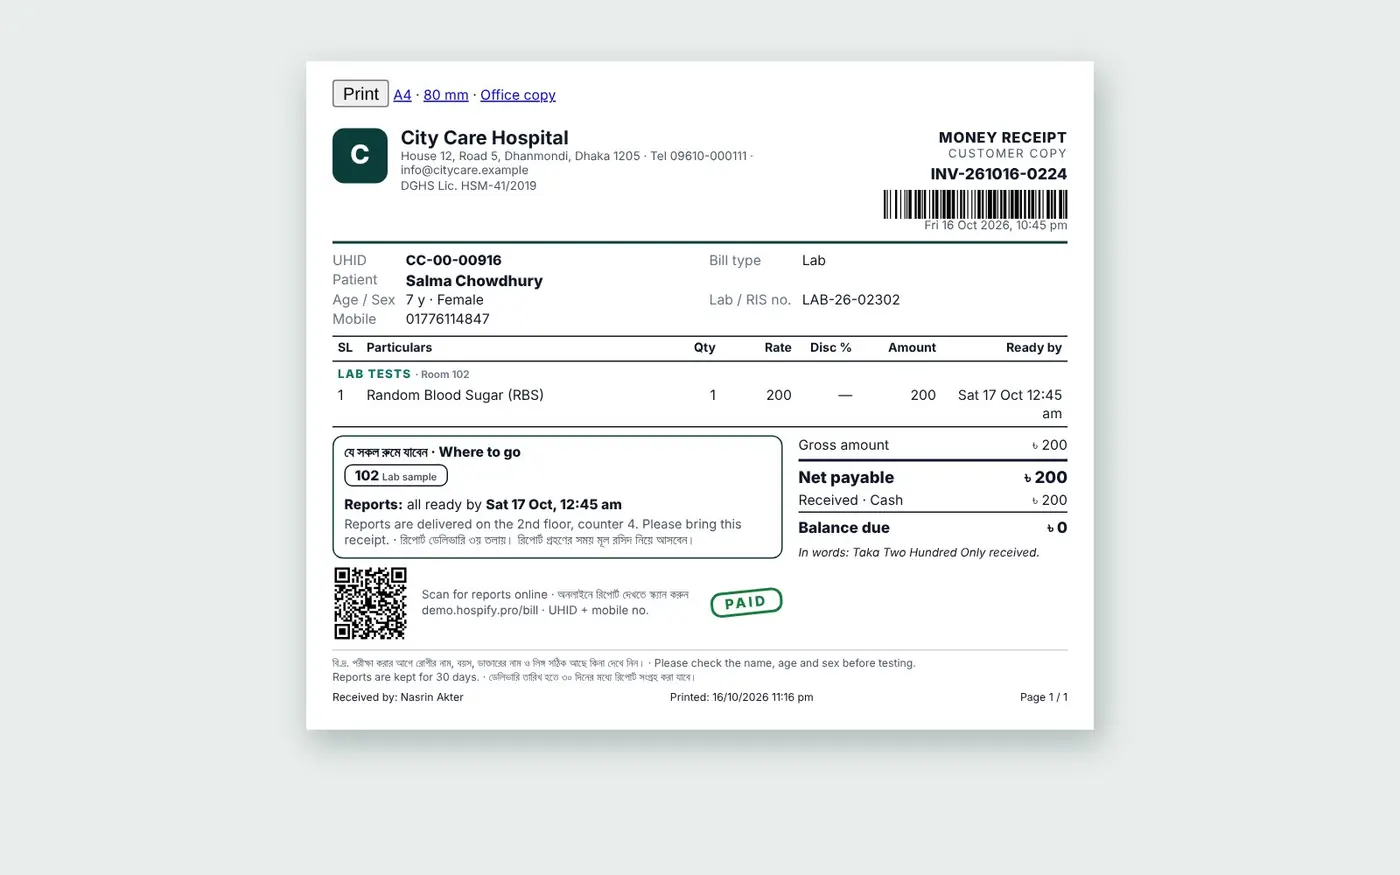
The money receipt prints with the patient’s serial, where to go next, and a Q R code to check the bill.
- A4, A5 or 80 mm
- Where to go next
- QR to check the bill
Step 8: Doctor’s consultation
In the O P D, the doctor presses Call next patient. History, vitals and past visits are on one screen, with I C D ten and eleven diagnosis codes and the medicine list built in.
- OPD → Call next patient
- History, vitals, past visits
- ICD-10/11 diagnosis

Step 9: The prescription
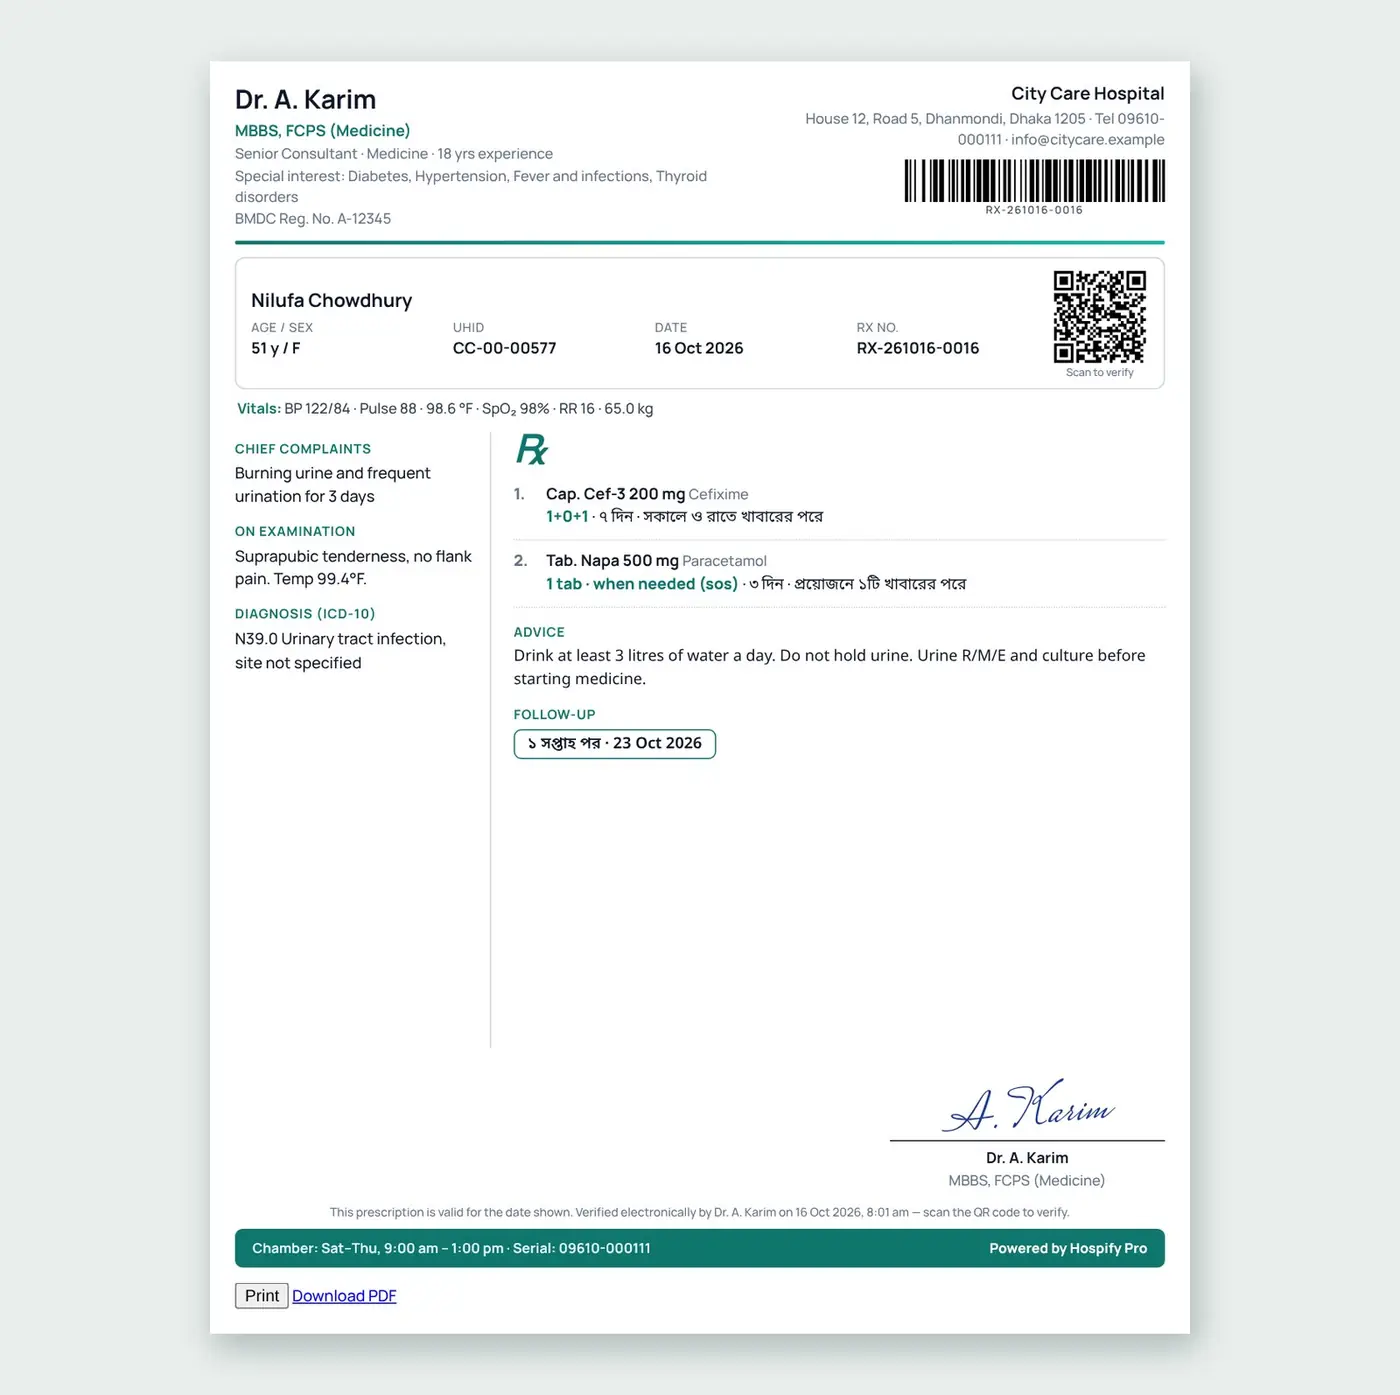
The prescription prints on the doctor’s letterhead, with dose instructions in Bangla, and a Q R code to verify it.
- On the doctor’s letterhead
- Bangla dose instructions
- QR to verify
Part 3: Admission and IPD
Step 10: Admit to a bed
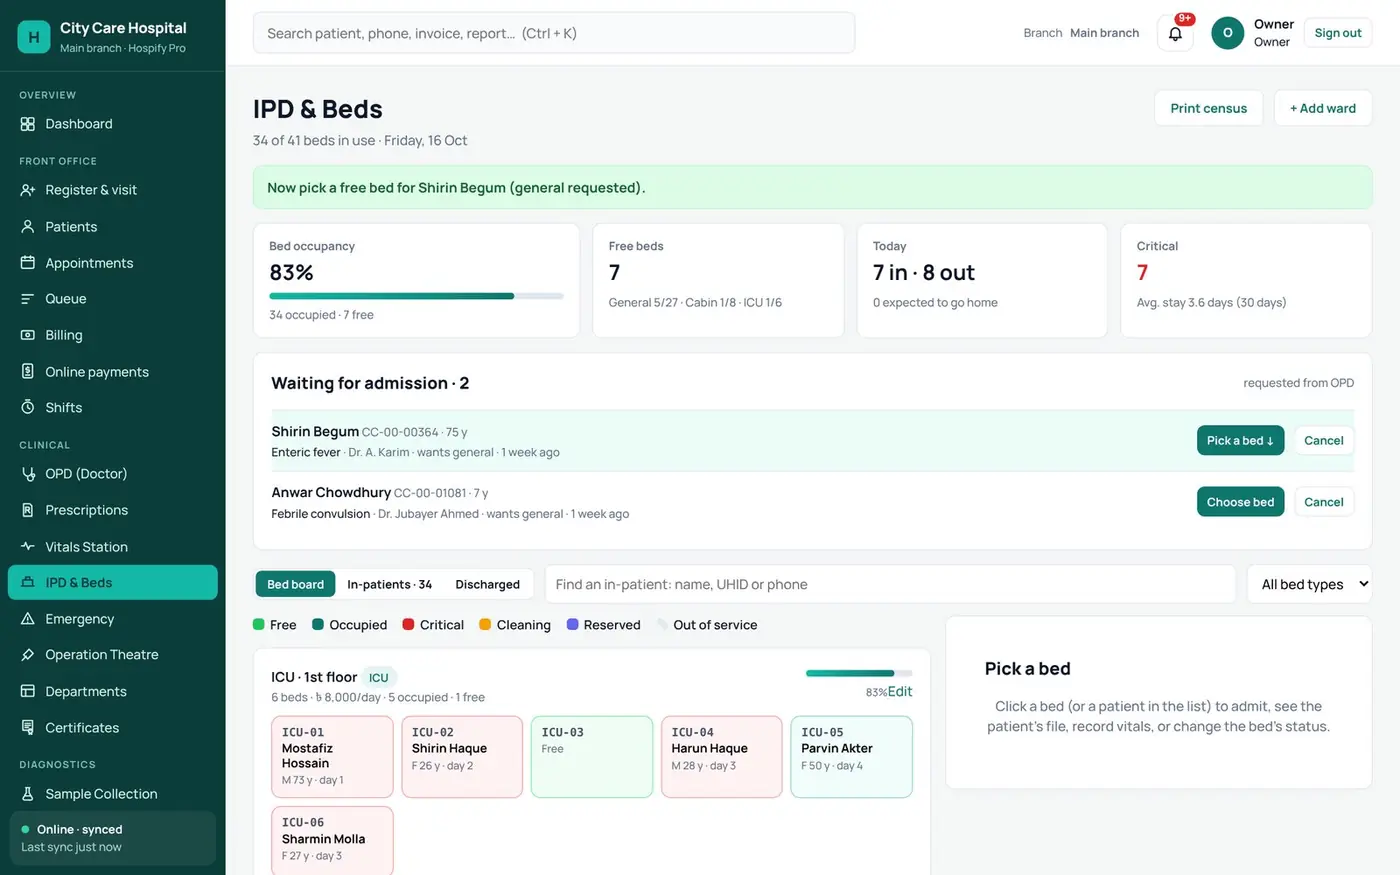
When a doctor admits a patient, they appear under Waiting for admission. Press Choose bed and pick a free bed on the board.
- Waiting for admission
- Requested from OPD or ER
- Choose bed
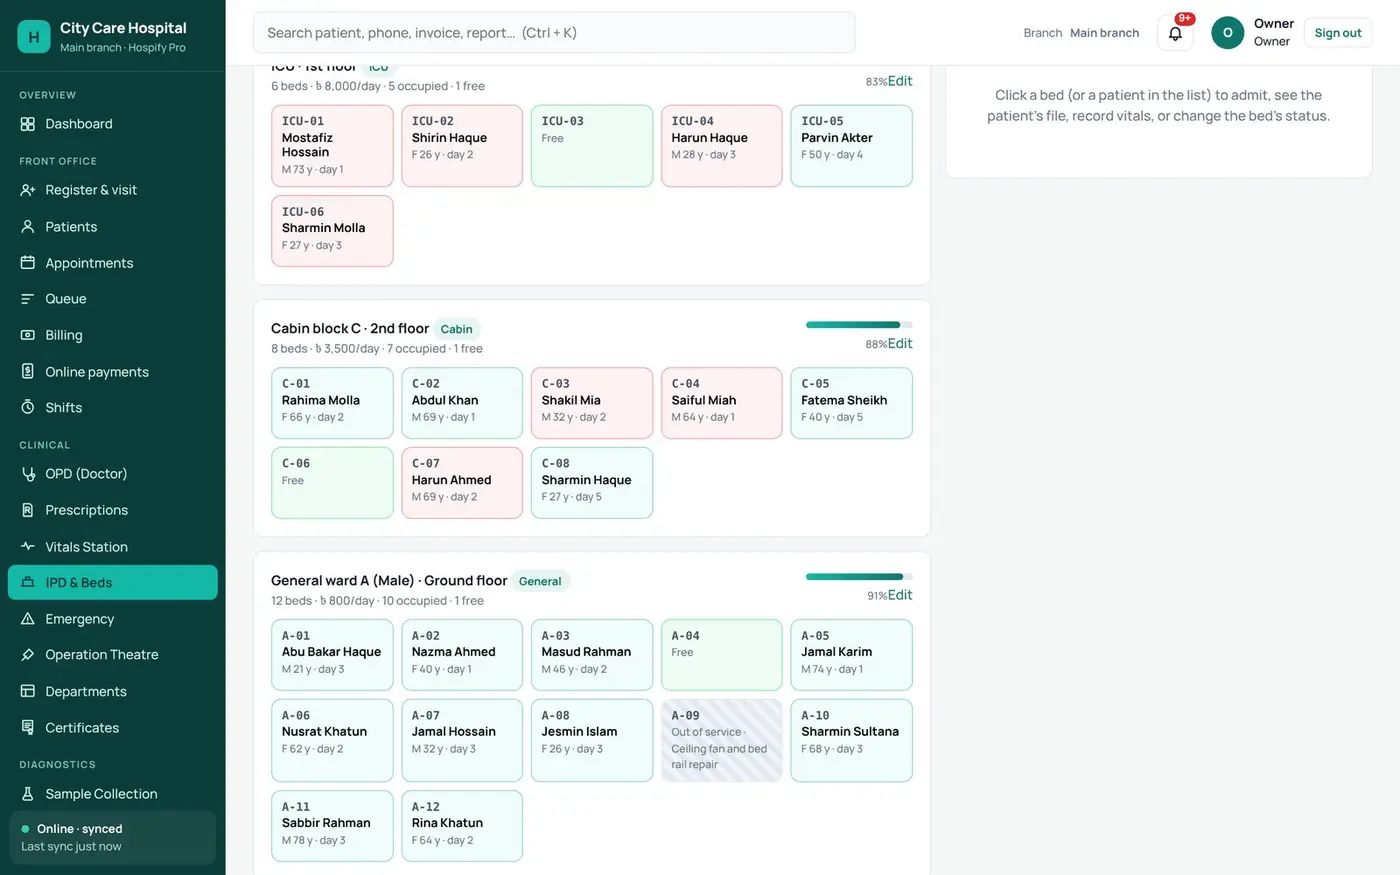
Step 11: The bed board
The bed board shows every ward and bed: who is in it, the day of stay, and which beds are critical, cleaning or free.
- Every ward and bed
- Occupied · critical · cleaning
- Day of stay
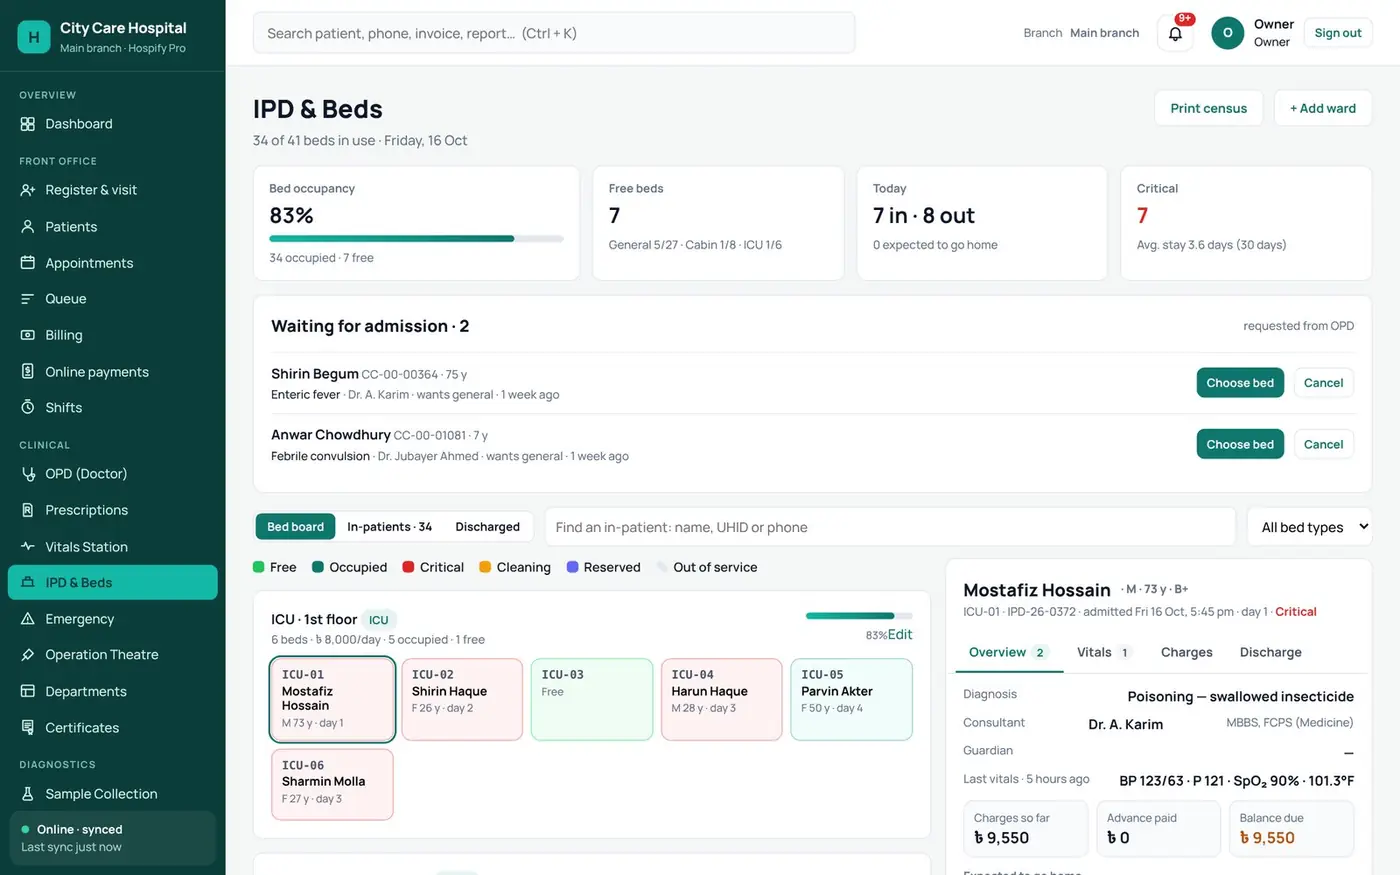
Step 12: The in-patient file
Click a bed to open the patient. Ward rounds, vitals, medicines and charges are added to one running bill every day.
- Ward rounds and vitals
- Charges added daily
- Running bill
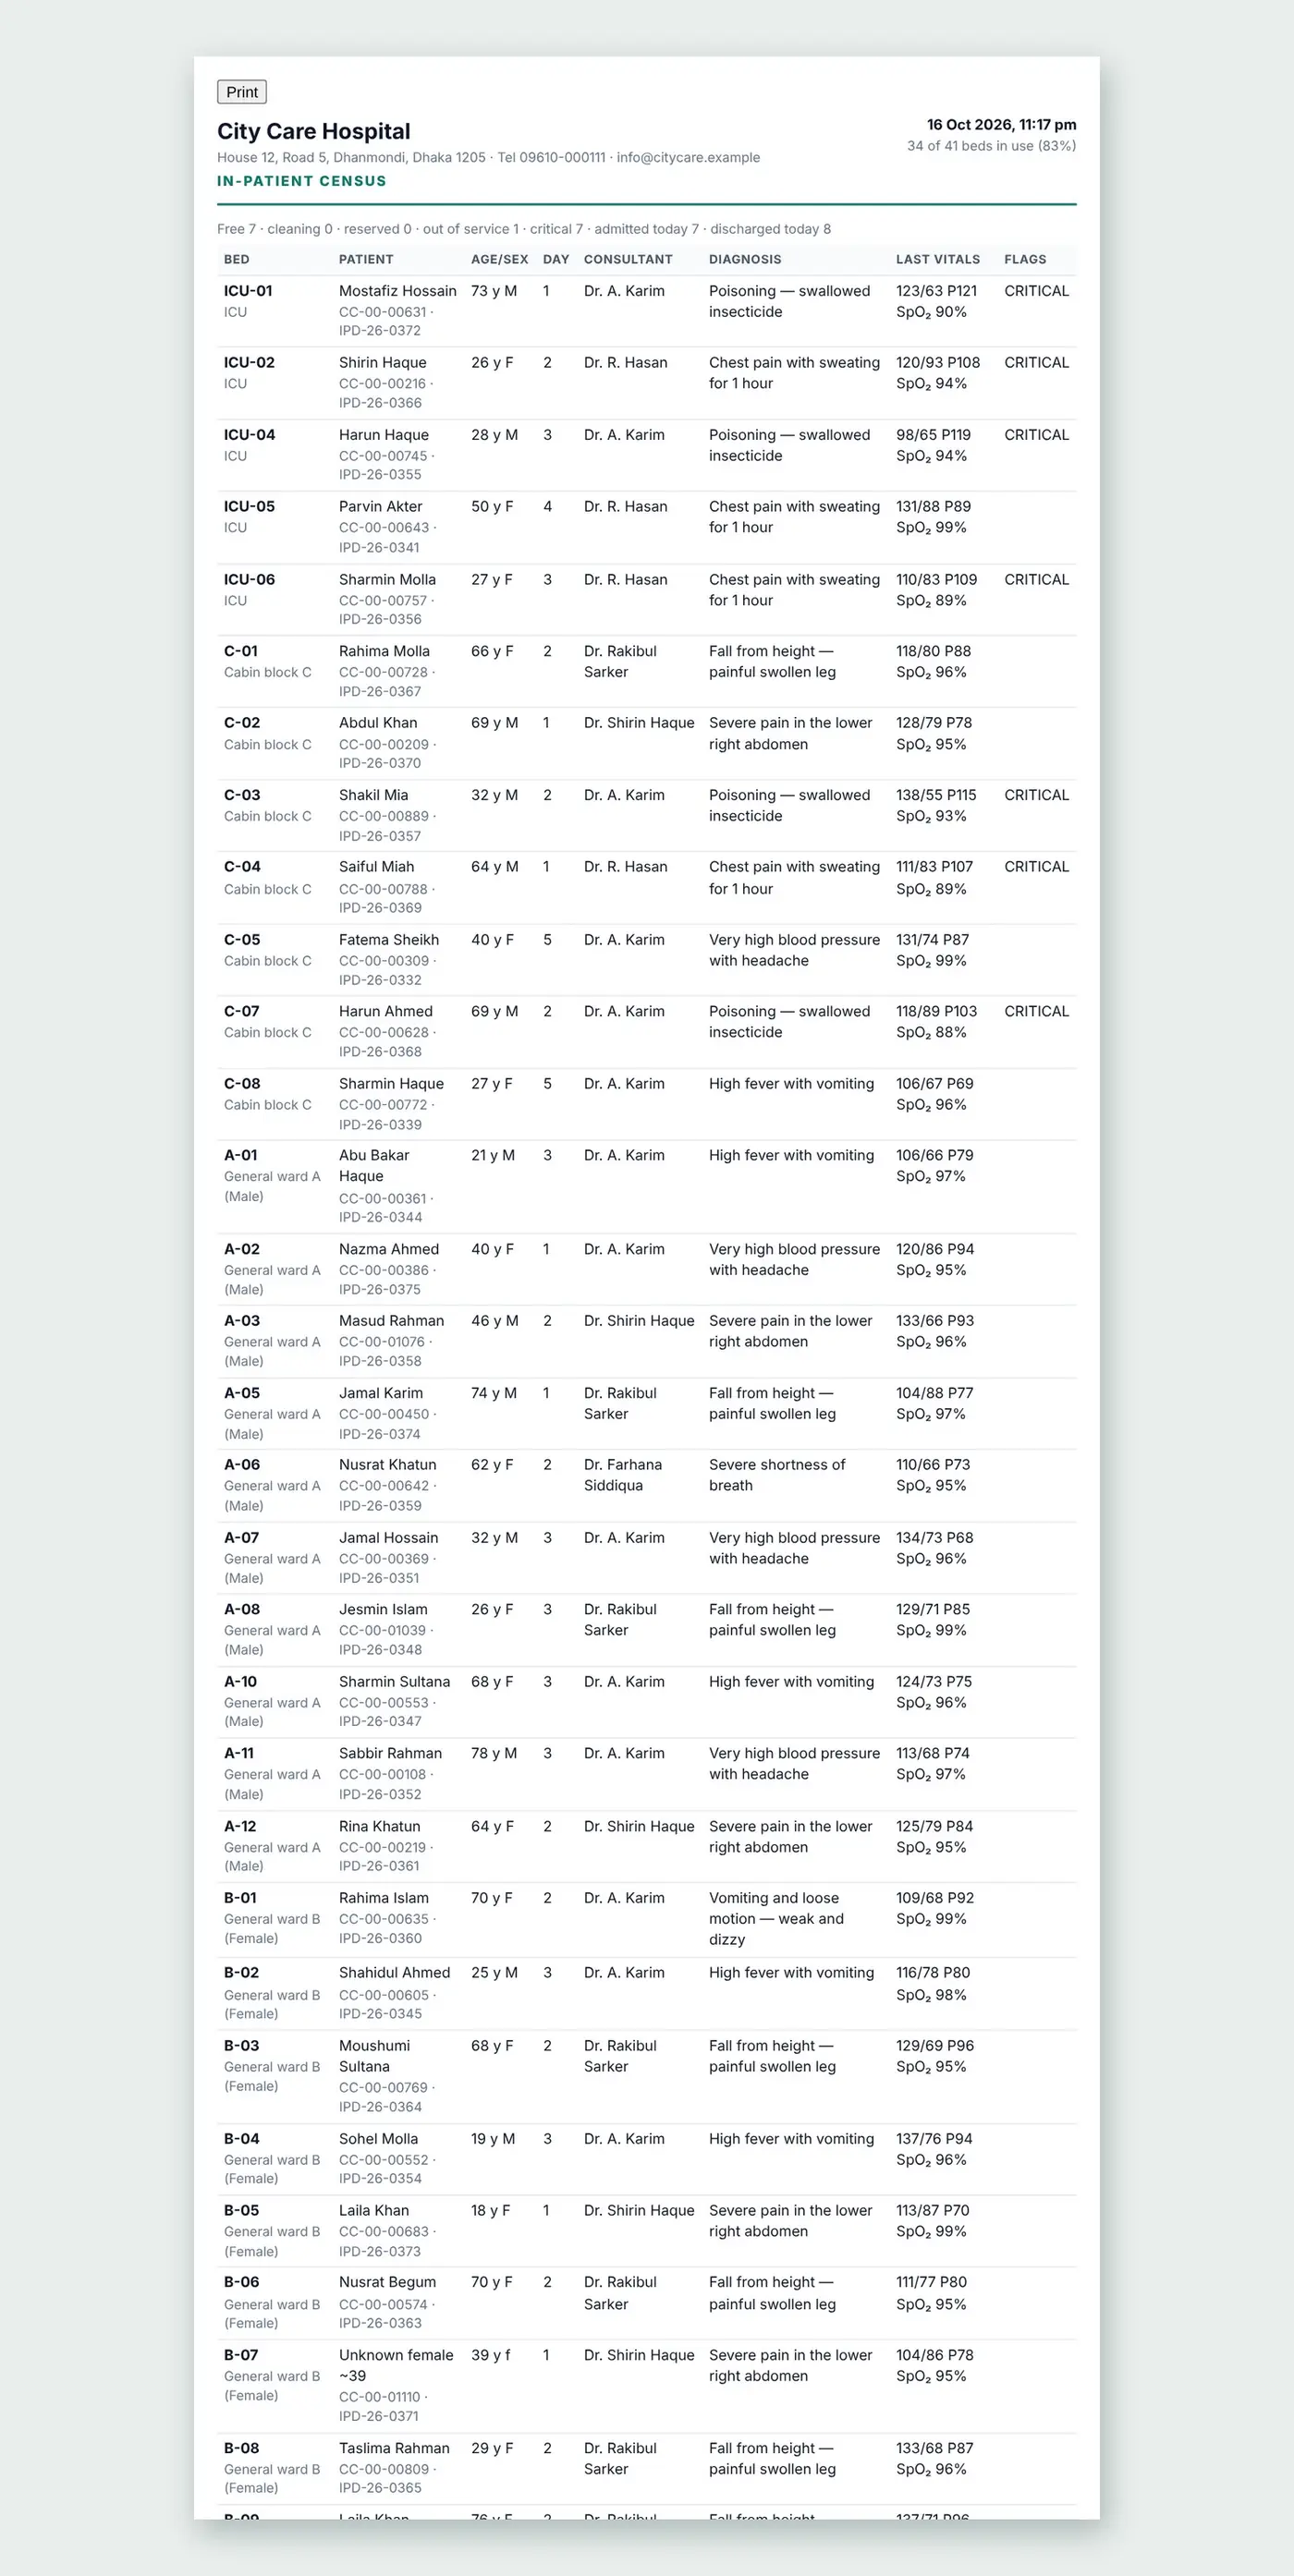
Step 13: Print the census
Print the in-patient census for the ward round: every bed, diagnosis, last vitals, and critical flags.
- Every bed and patient
- Diagnosis · last vitals
- Critical flags
Part 4: Emergency and the operation theatre
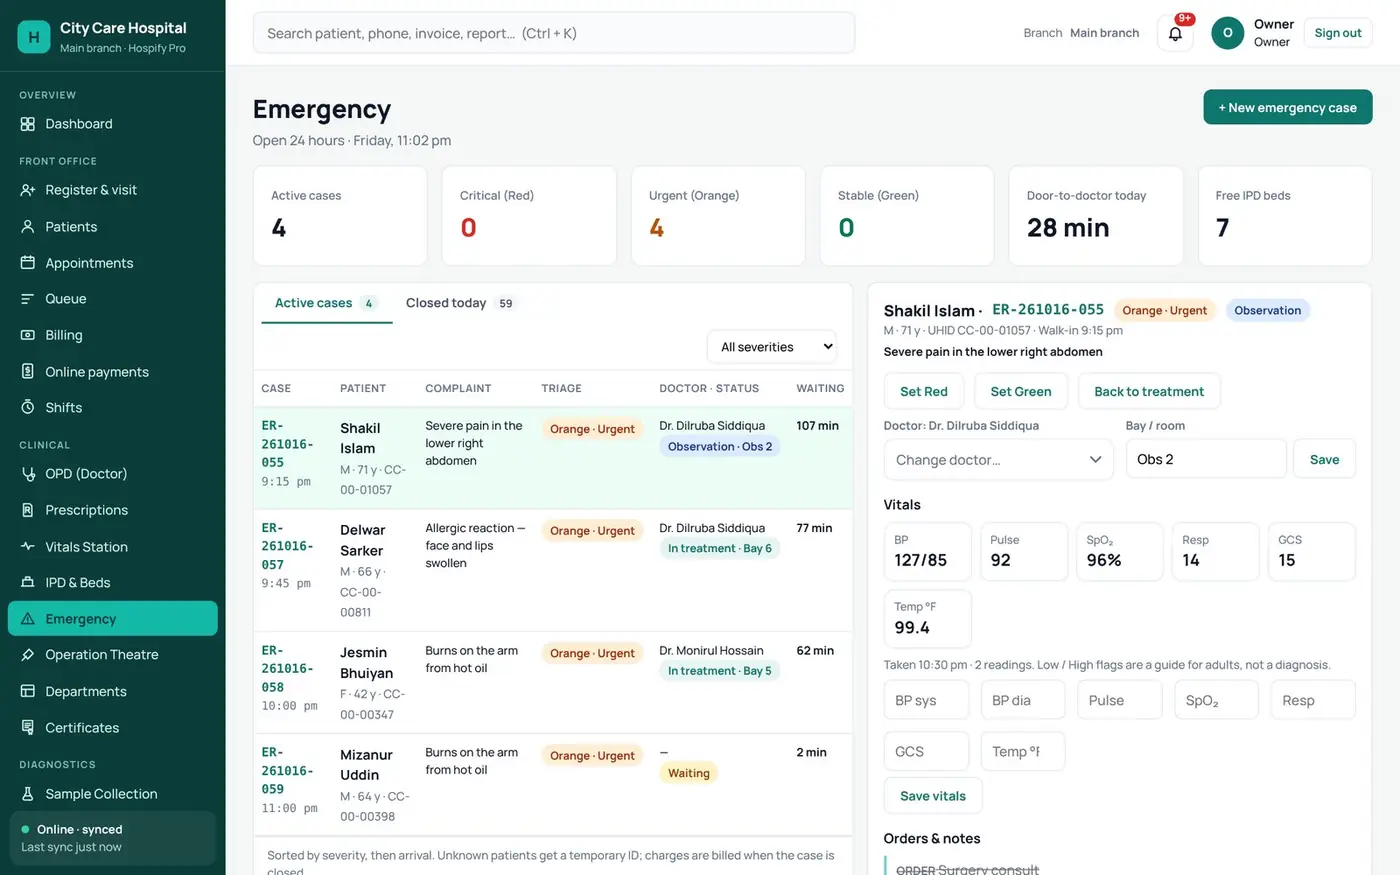
Step 14: Emergency triage
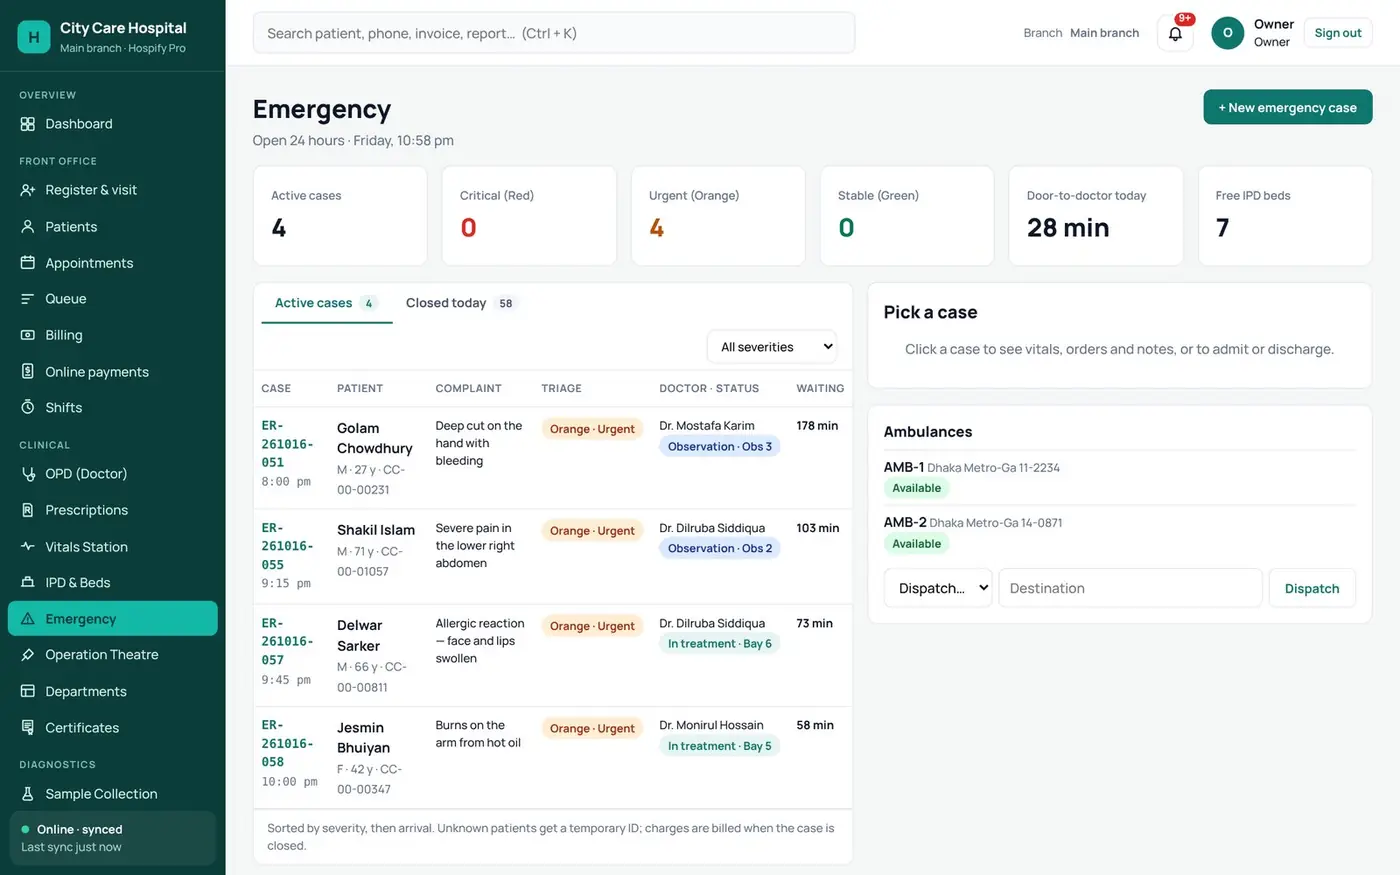
In Emergency, open a new case and triage the patient red, orange or green. The screen tracks every active case and the door-to-doctor time.
-
- New emergency case
- Red · Orange · Green
- Door-to-doctor time
Step 15: The emergency case
Inside the case, record notes and orders, and add charges as you go. When you close the case, the bill goes to the billing counter, or the patient is admitted.
- Notes, orders, medicines
- Running emergency bill
- Close · admit · refer
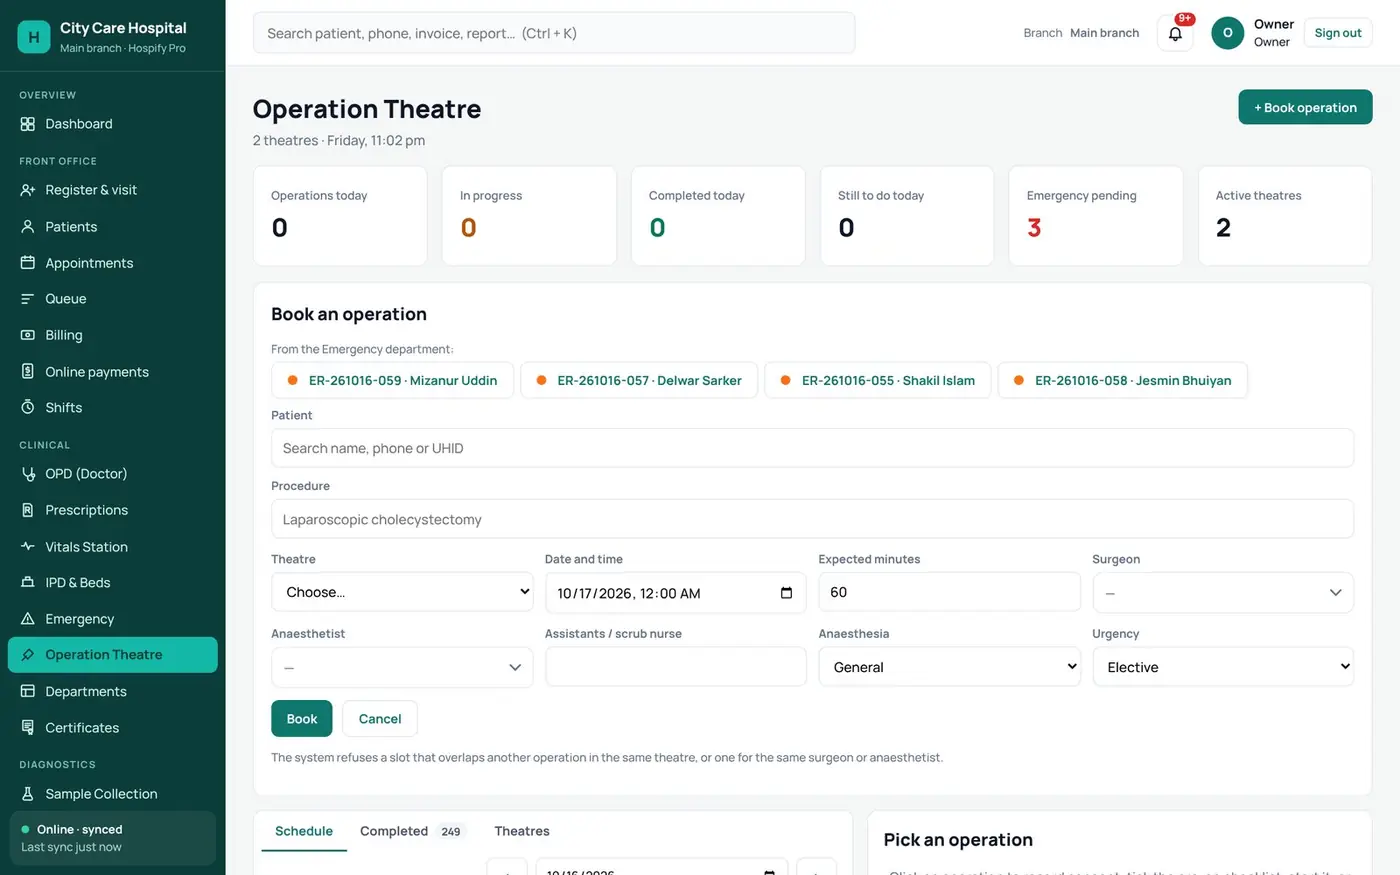
Step 16: Book an operation
To book an operation, choose the patient, the procedure, the theatre, the surgeon and anaesthetist, and the time.
-
- Book operation
- Theatre · surgeon · anaesthetist
- Date and time
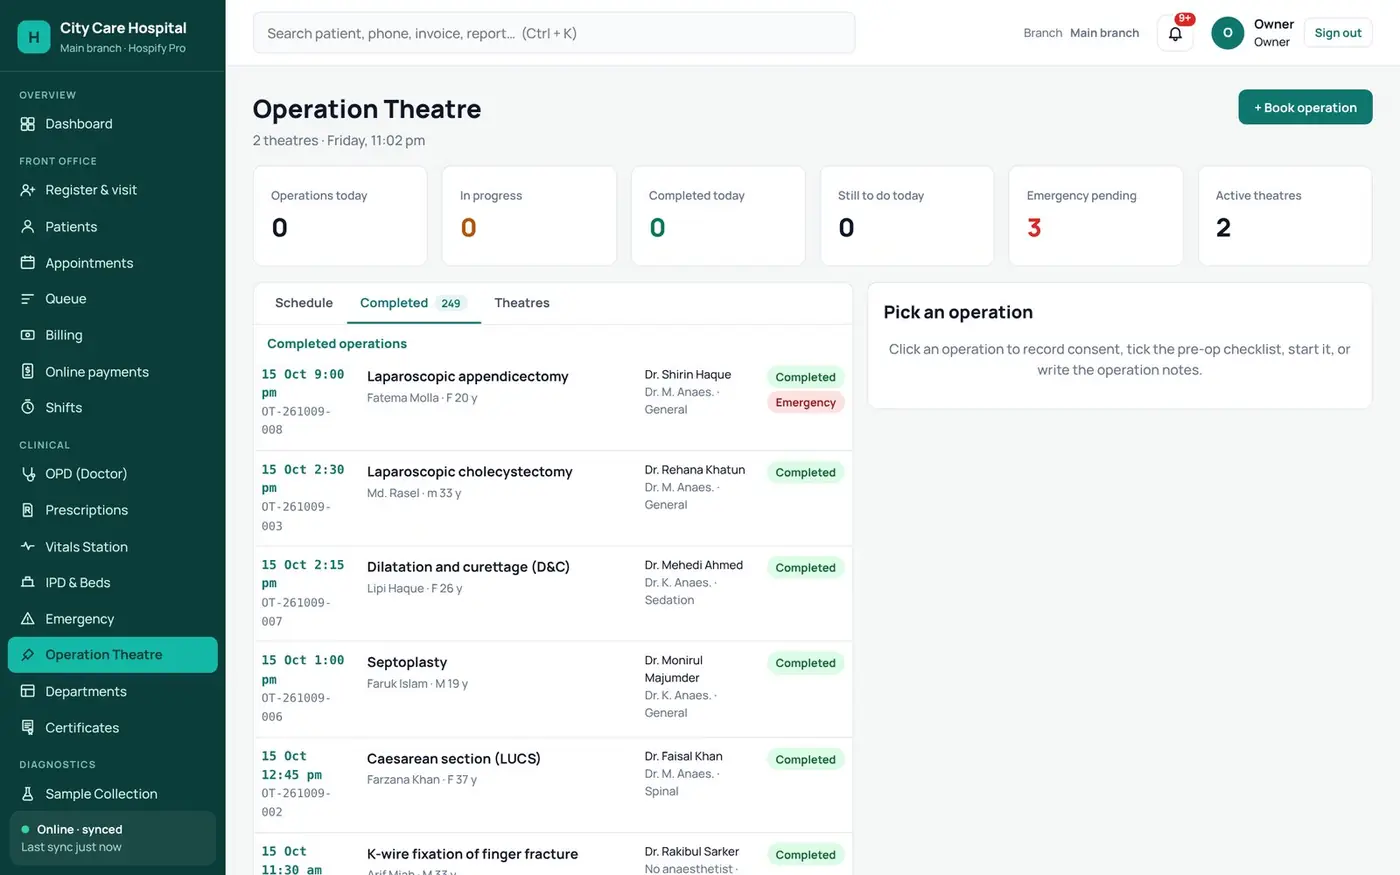
Step 17: Consent, checklist and notes
Each operation carries its consent, pre-op checklist, operation notes and charges.
- Consent and pre-op checklist
- Start and finish
- Operation notes and charges
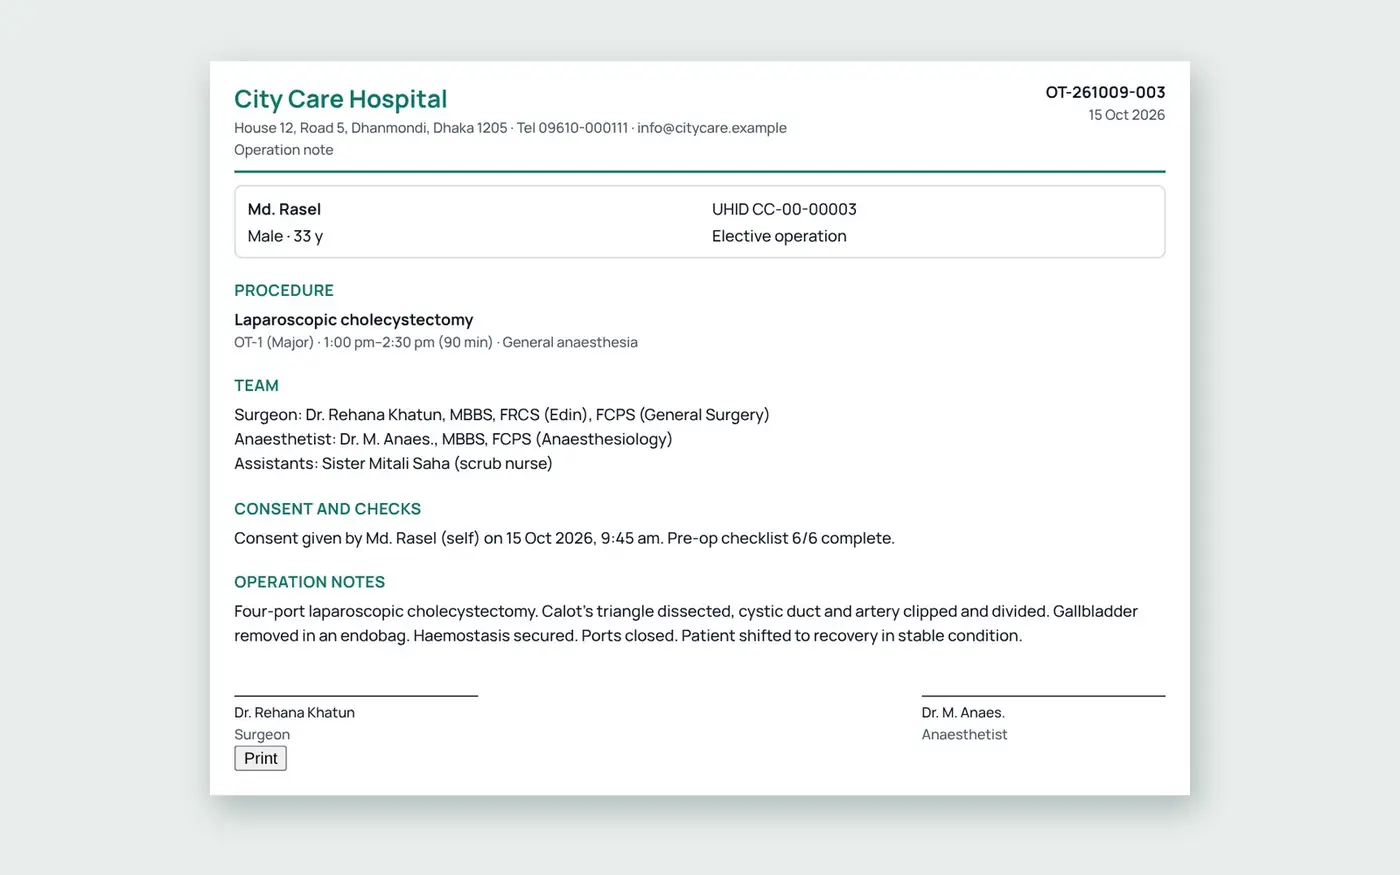
Step 18: The operation note
The operation note prints with the procedure, the team, consent and checks, and space for the surgeon’s and anaesthetist’s signatures.
- Procedure and team
- Consent and checks
- Signed by surgeon and anaesthetist
Part 5: Lab, pharmacy and certificates
Step 19: Laboratory
Paid tests arrive in the laboratory automatically. Samples are collected with barcode labels, results are entered, and a pathologist verifies and locks the report.
- Paid tests arrive automatically
- Sample · result · verify
- Locked after verification

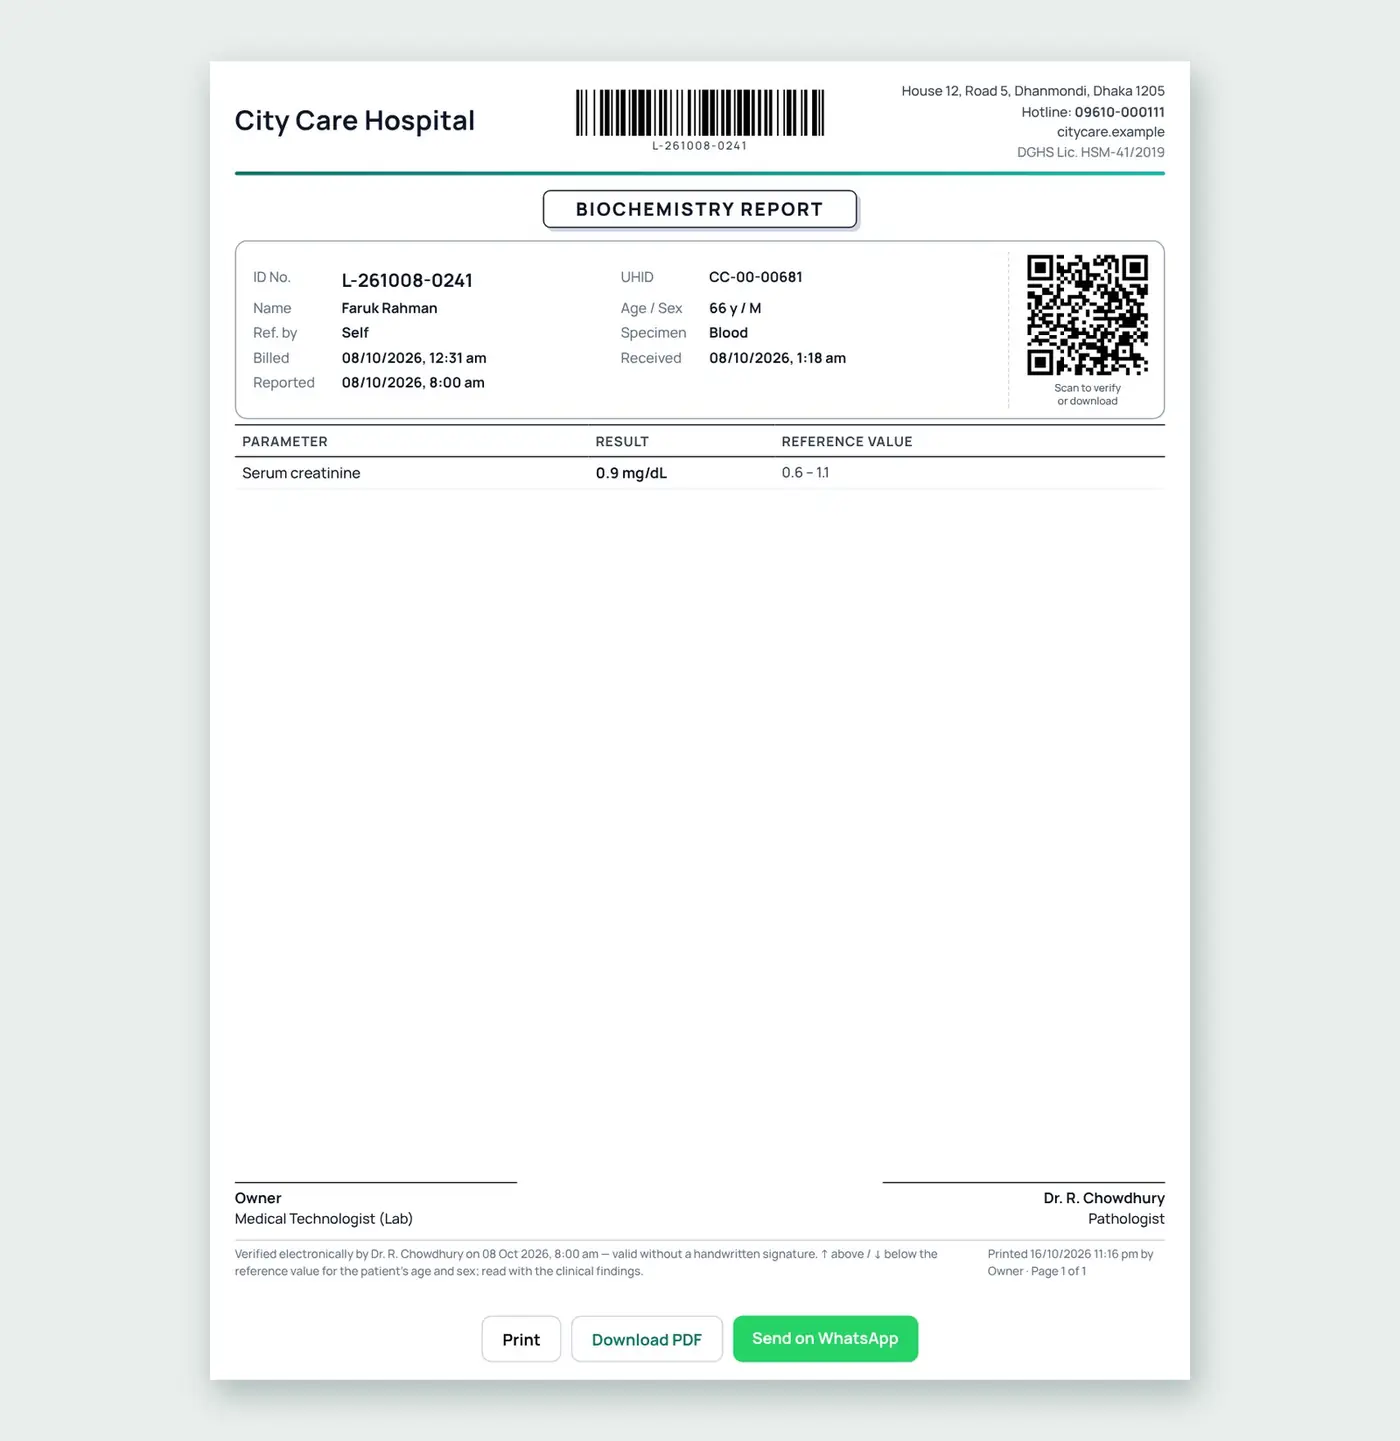
Step 20: The lab report
The lab report prints with reference ranges, flags and the pathologist’s name, and can be sent to the patient on WhatsApp.
- Reference ranges and flags
- Pathologist’s name
- QR and WhatsApp delivery
Step 21: Hospital pharmacy
The hospital pharmacy sells at the counter, or issues medicines to wards against the patient’s bill, by batch and expiry.
- Counter and ward issue
- Load a prescription
- Batch and expiry tracked

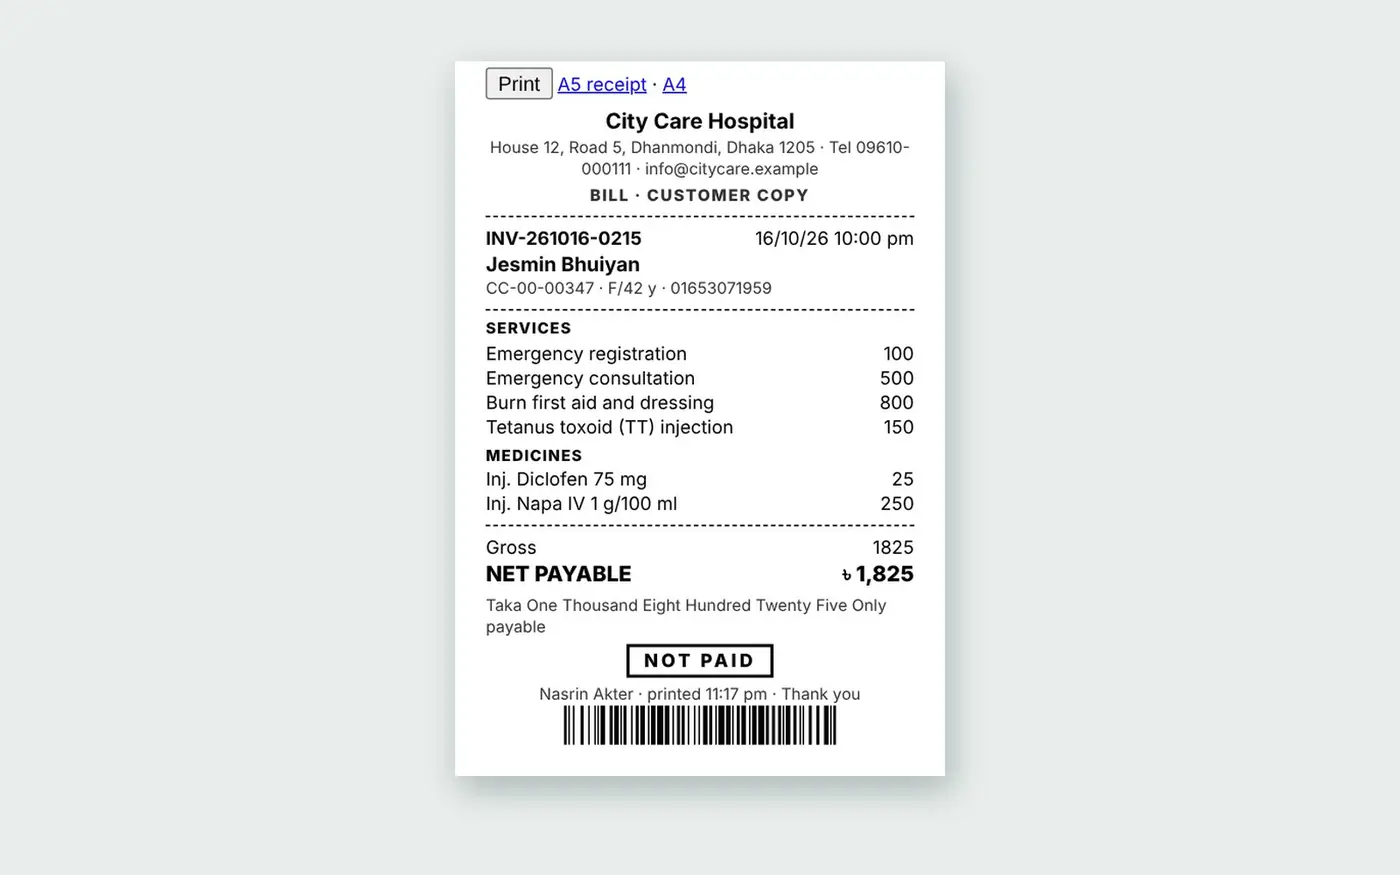
Step 22: The pharmacy bill
Every pharmacy or ward bill prints as a short receipt.
- 80 mm receipt
- Services and medicines
- Paid or not paid
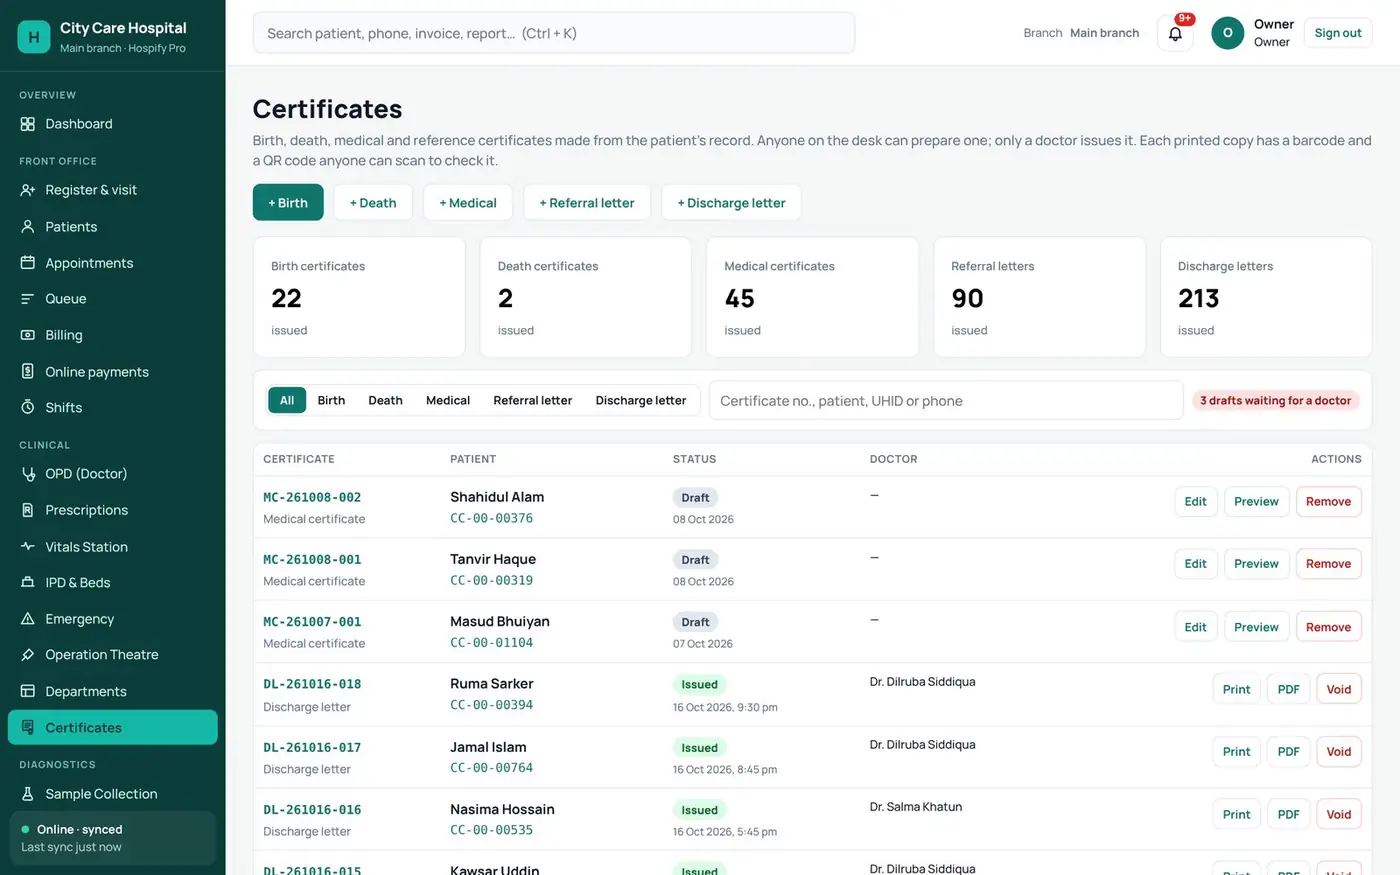
Step 23: Certificates
Certificates are made from the patient’s record: birth, death, medical, referral and discharge letters. Anyone on the desk can prepare one, but only a doctor issues it.
- Birth · death · medical
- Referral and discharge letters
- Only a doctor issues
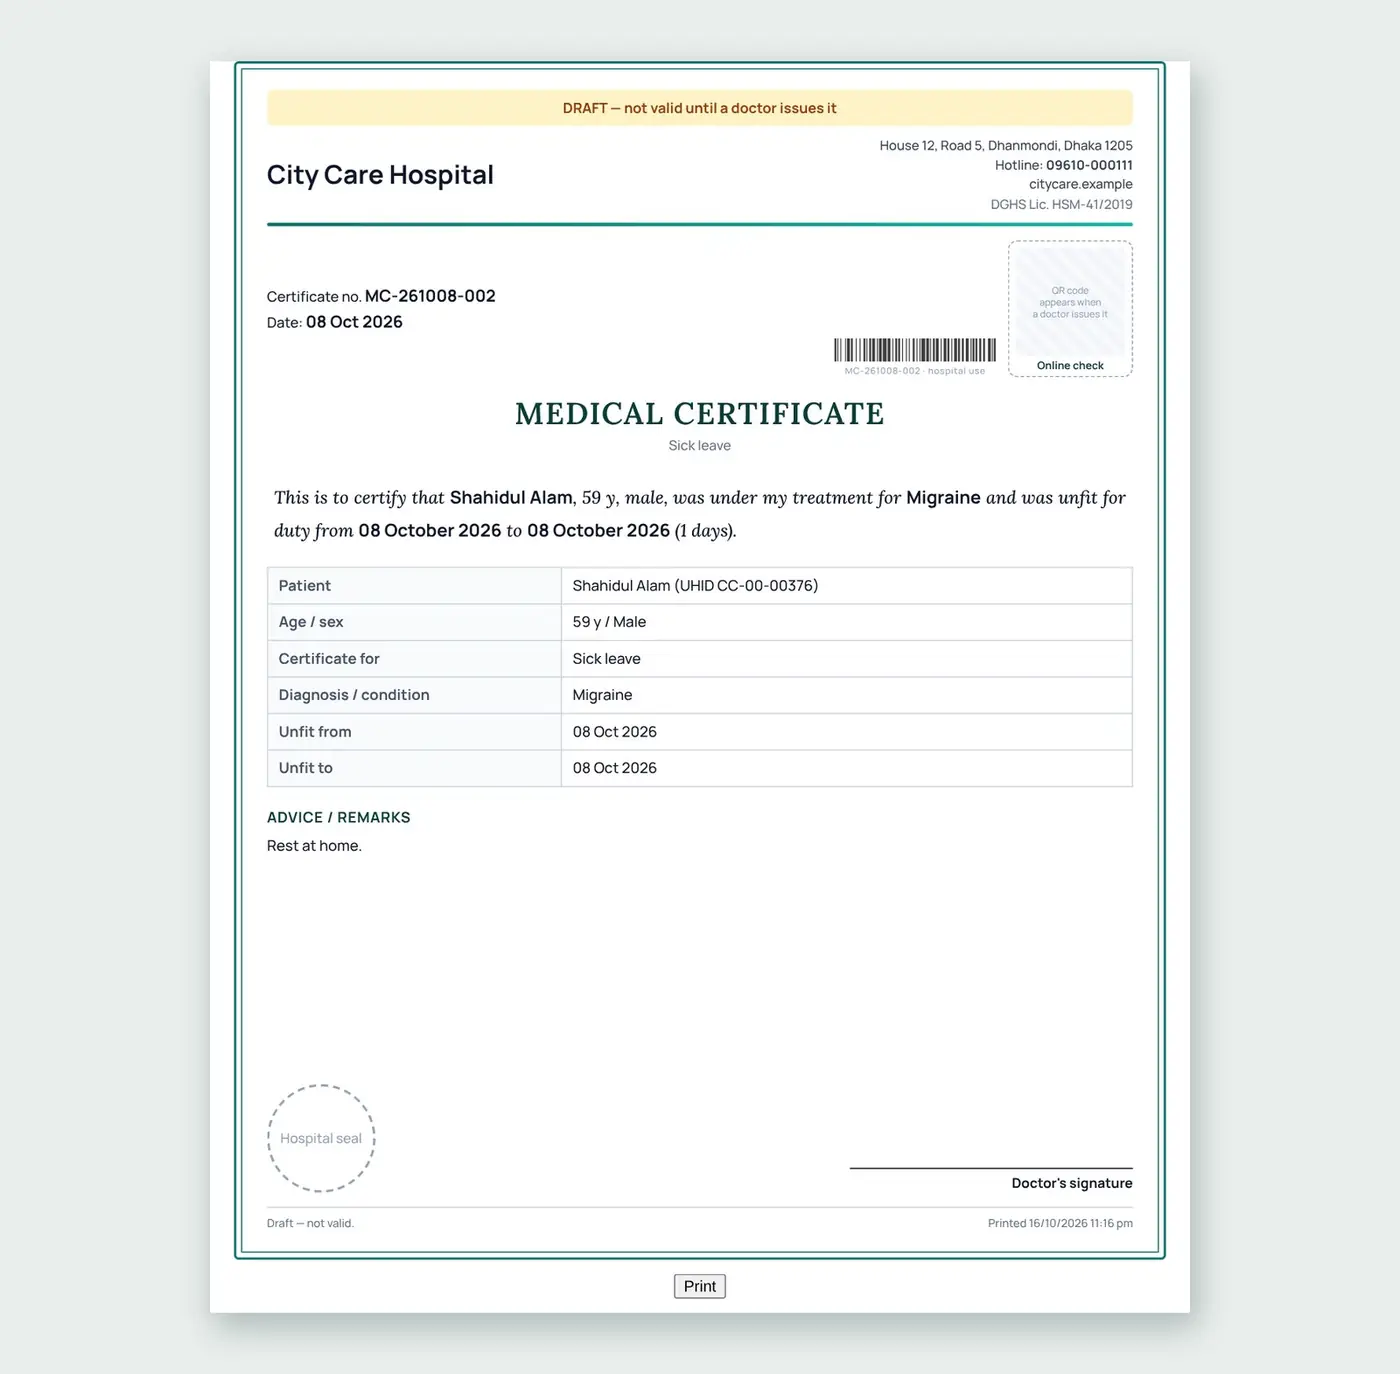
Step 24: Medical certificate
A medical certificate prints with a barcode and a Q R code anyone can scan to check it.
- From the patient’s record
- Barcode and QR to verify
- Doctor’s signature
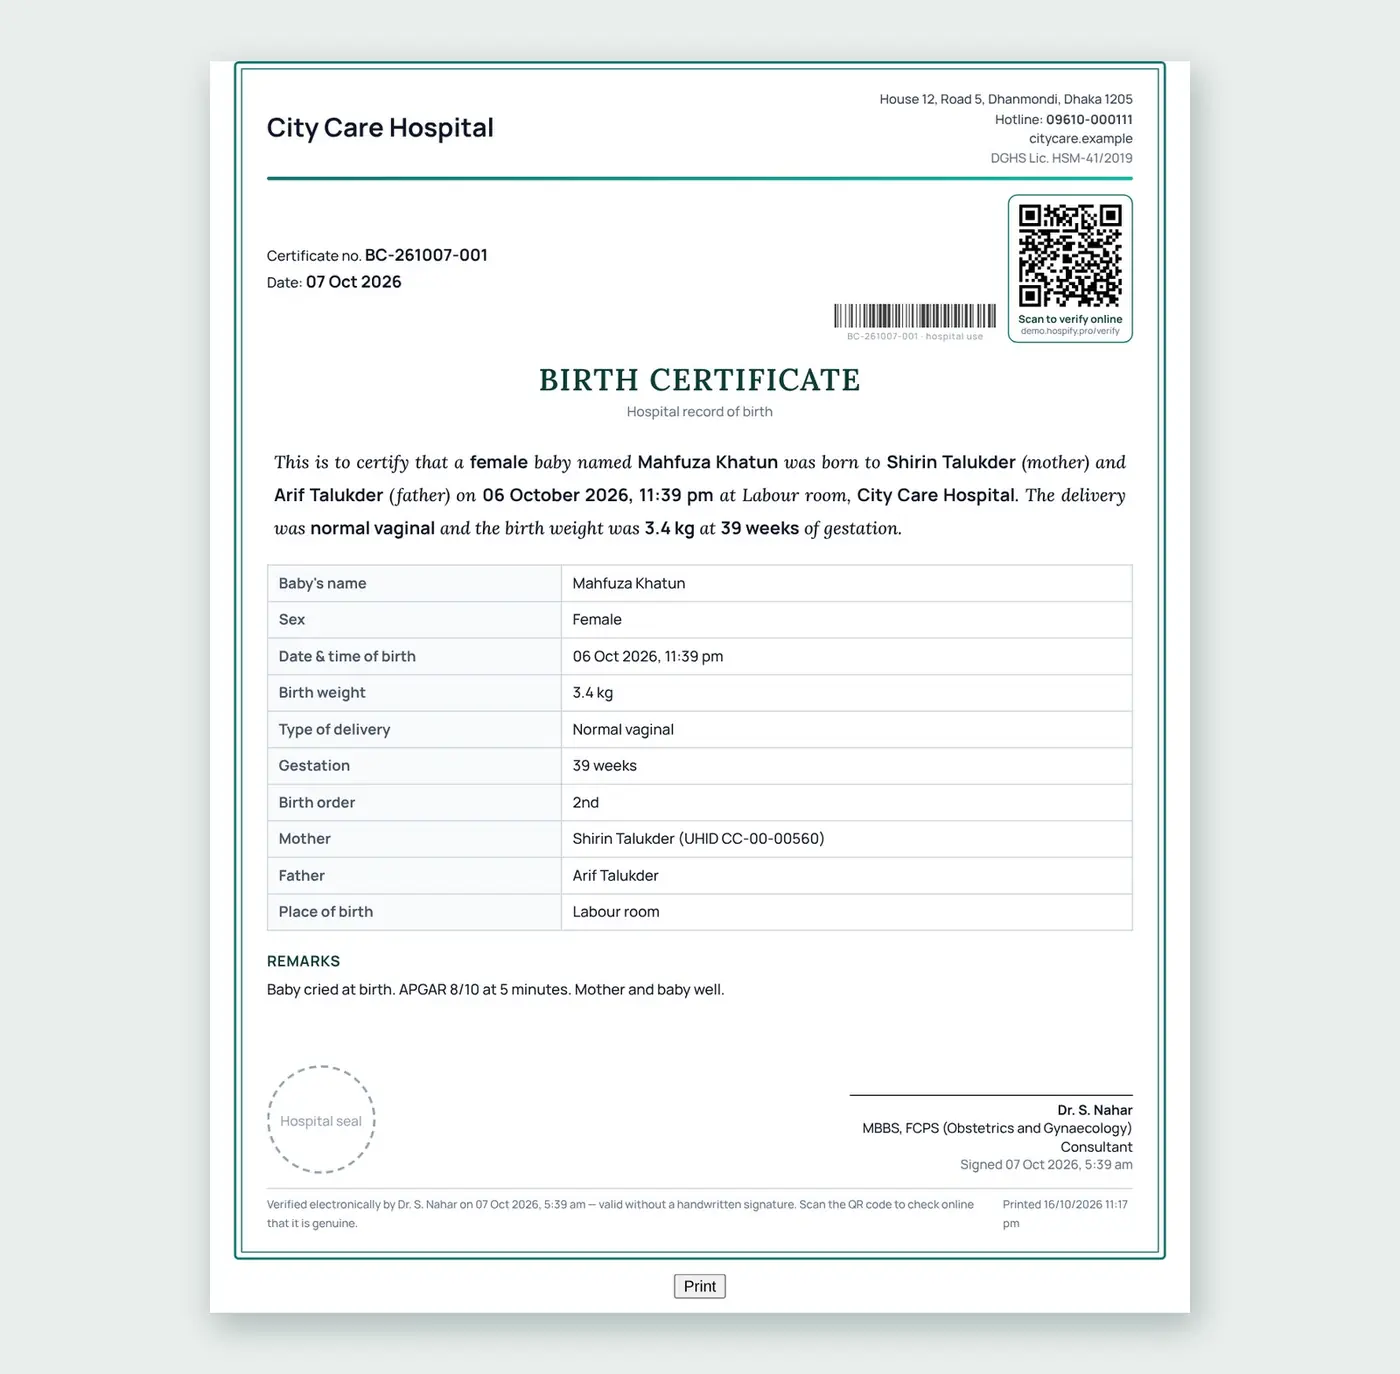
Step 25: Birth certificate
The birth certificate records the baby’s details, the parents, the time, weight and type of delivery.
- Baby, mother and father
- Time, weight, delivery
- Doctor issued
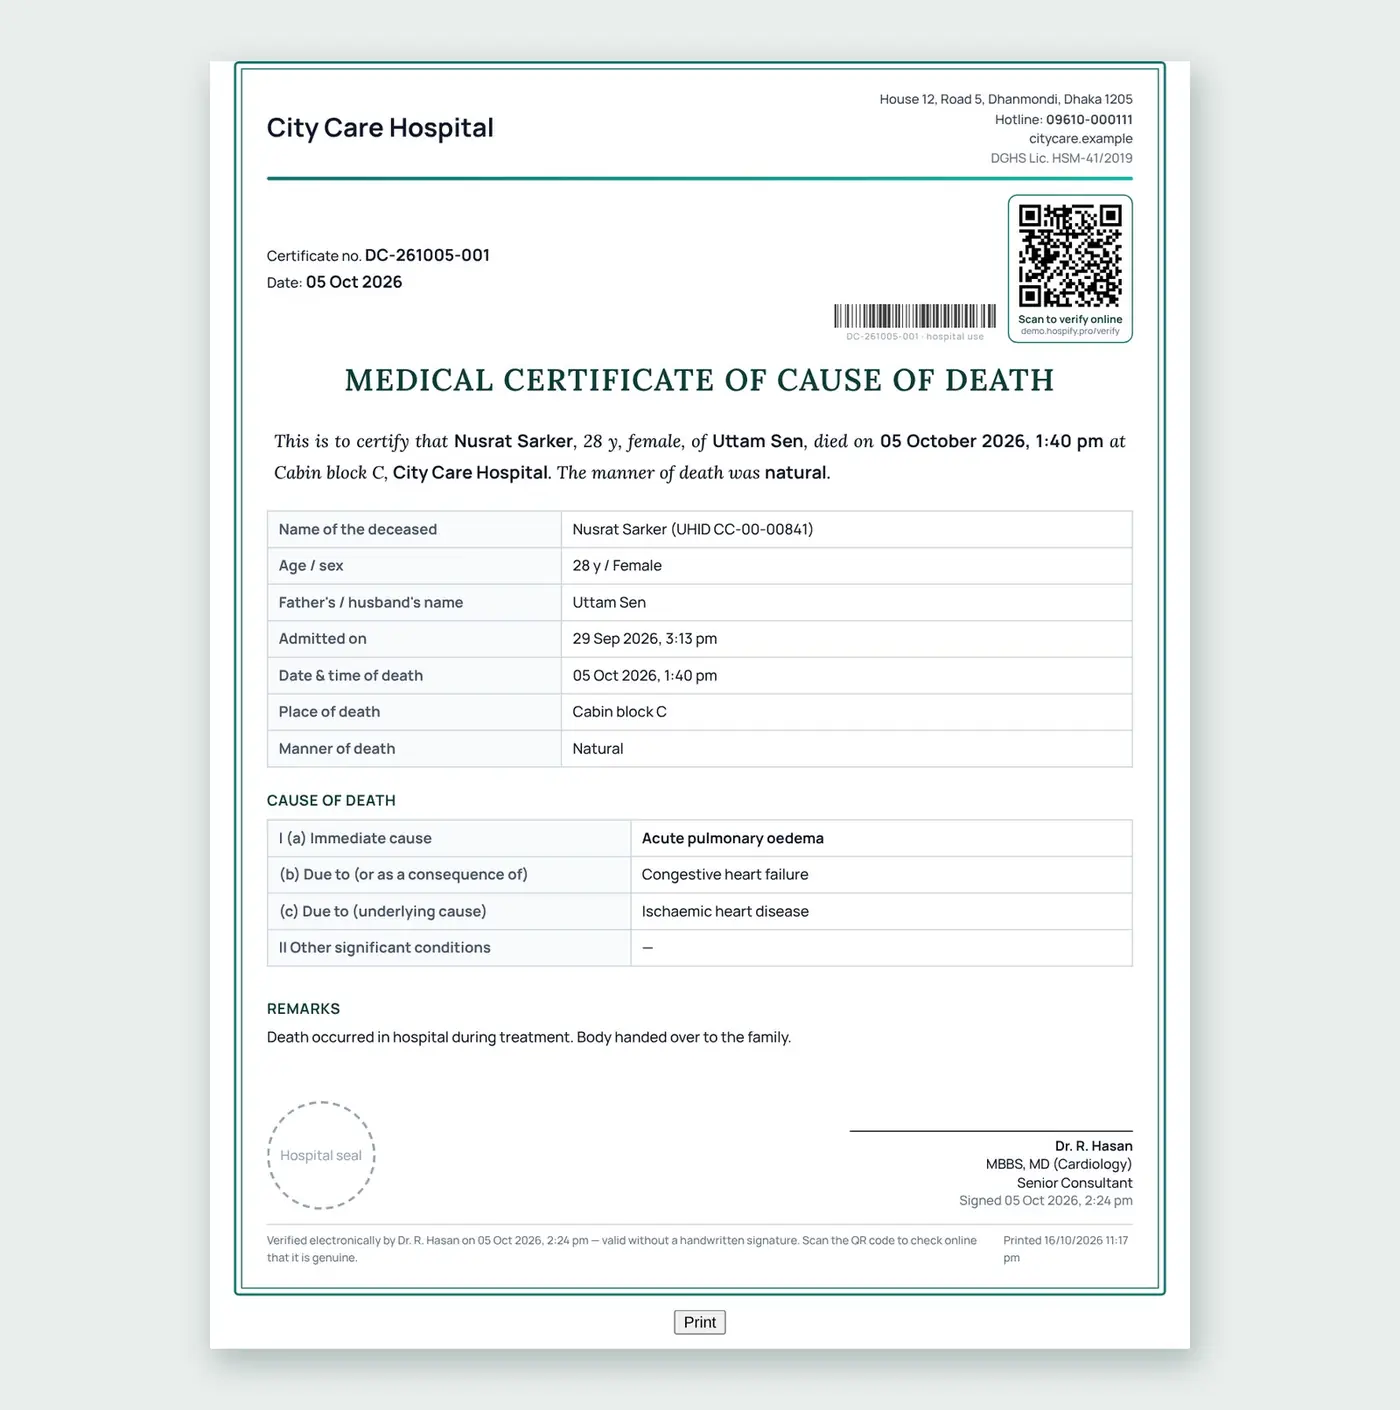
Step 26: Death certificate
The medical certificate of cause of death follows the standard format, with the immediate and underlying causes.
- Medical cause of death
- Immediate and underlying cause
- Doctor issued
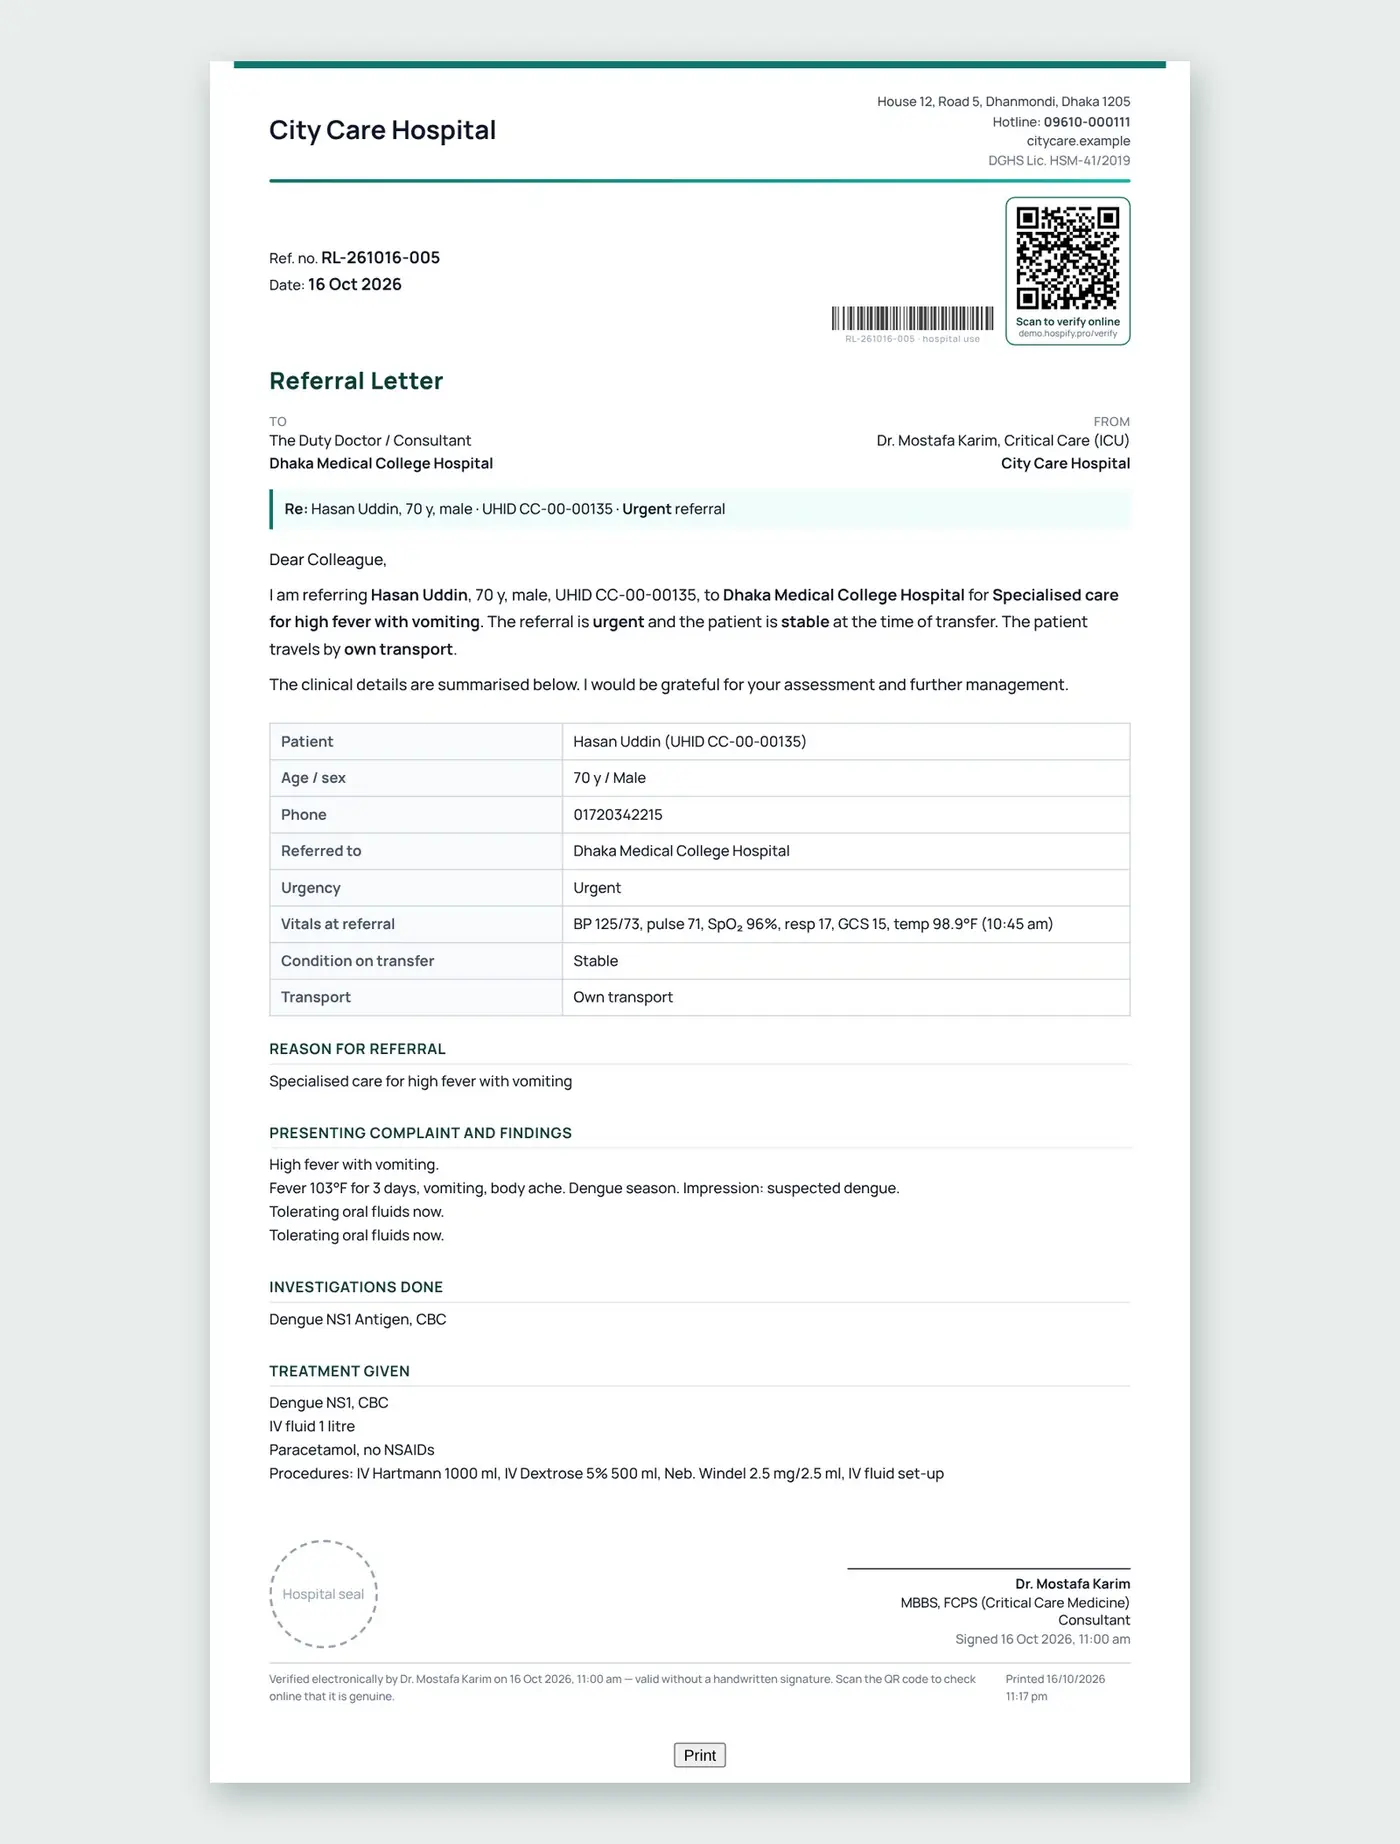
Step 27: Referral letter
A referral letter carries the findings, treatment so far, and the reason for referral.
- Findings and treatment
- Reason for referral
- To another hospital
Part 6: Discharge and the final bill
Step 28: Discharge summary
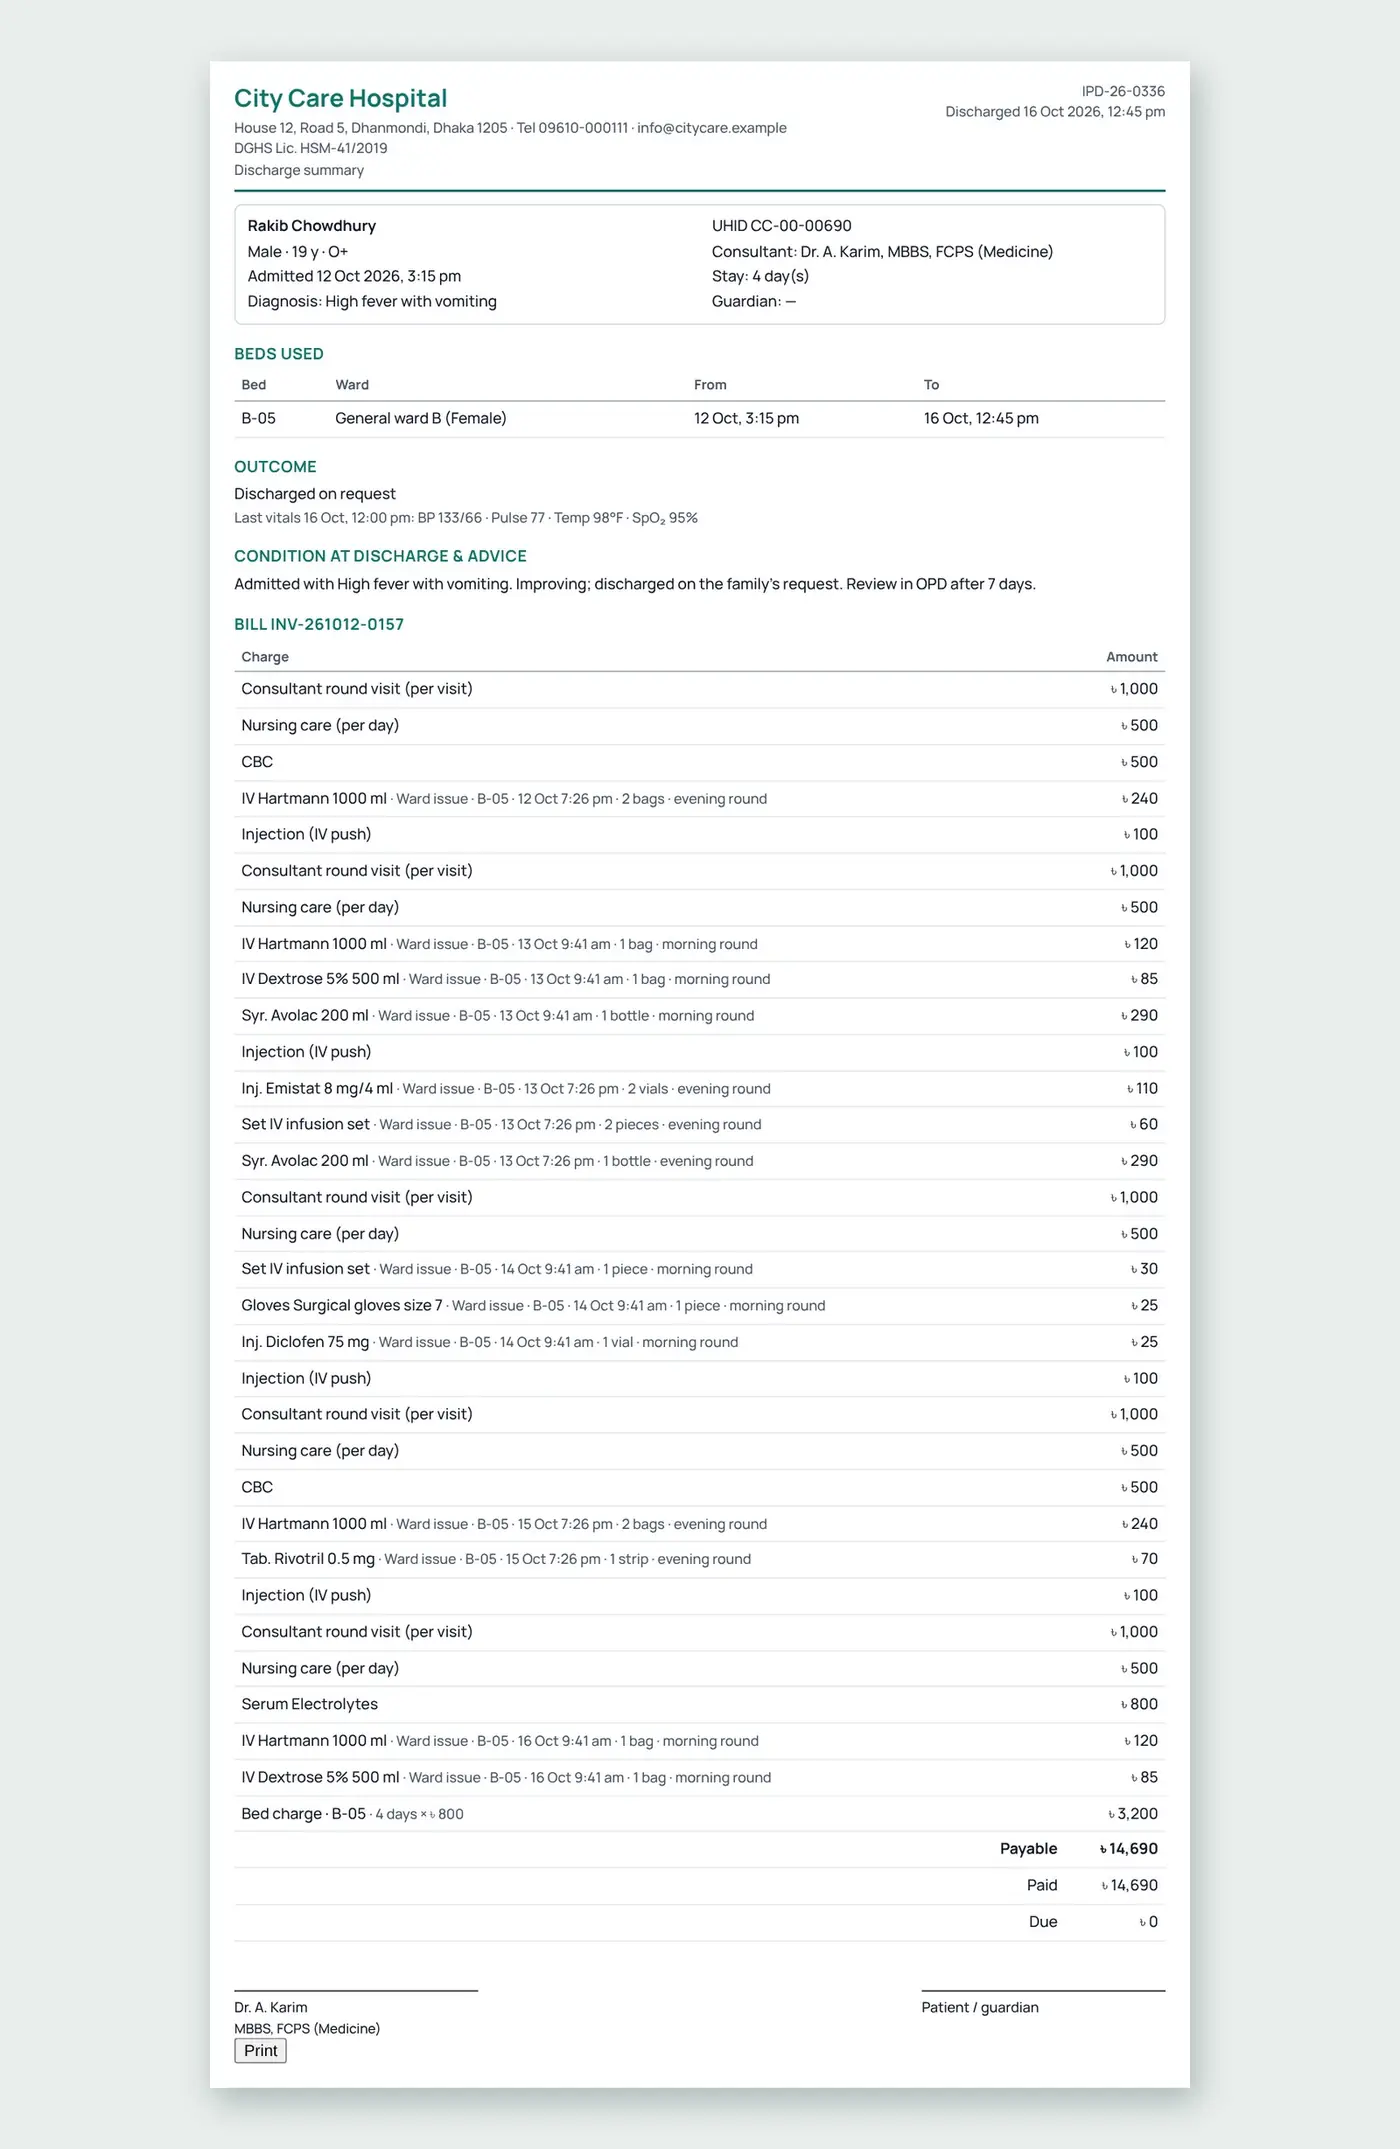
At discharge, the summary prints with the beds used, the outcome, the condition and advice, and every charge on the bill.
- Beds used and outcome
- Condition and advice
- Every charge on the bill
Step 29: Discharge letter
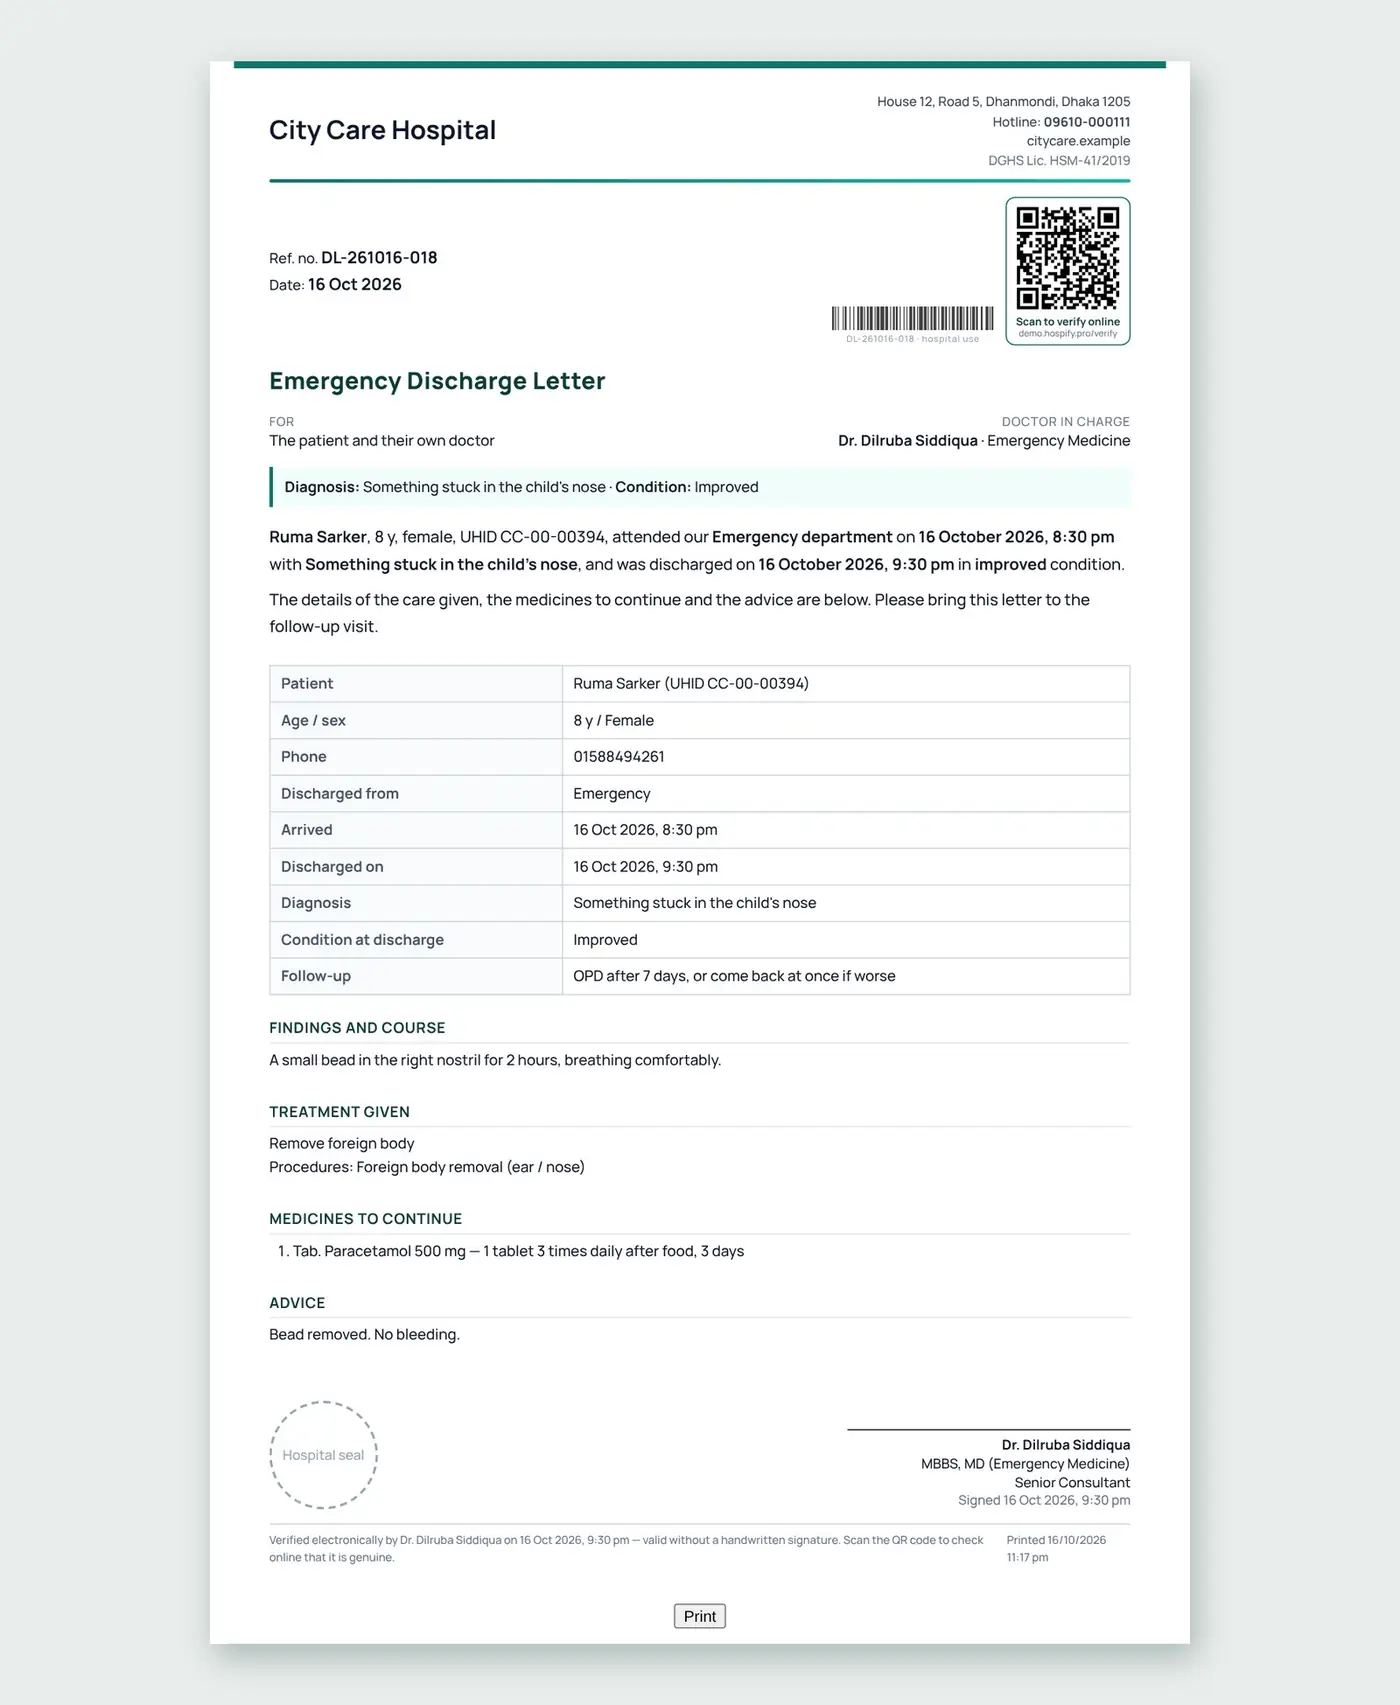
The discharge letter gives the patient their diagnosis, treatment, medicines to continue, and follow-up advice.
- Diagnosis and treatment
- Medicines to continue
- Follow-up advice
Step 30: The final bill
The final bill lists every I P D charge, the advance and payments, and the balance due.
- All IPD charges
- Advance and payments
- Balance due

Part 7: Back office
Step 31: Accounts, posted automatically
Every bill, payment, refund, advance and expense is posted to Accounts automatically, so profit and loss, and cash and bank balances, are always up to date.
- Every bill and payment
- Profit & loss · cash & bank
- Supplier bills · expenses

Step 32: Staff and HR
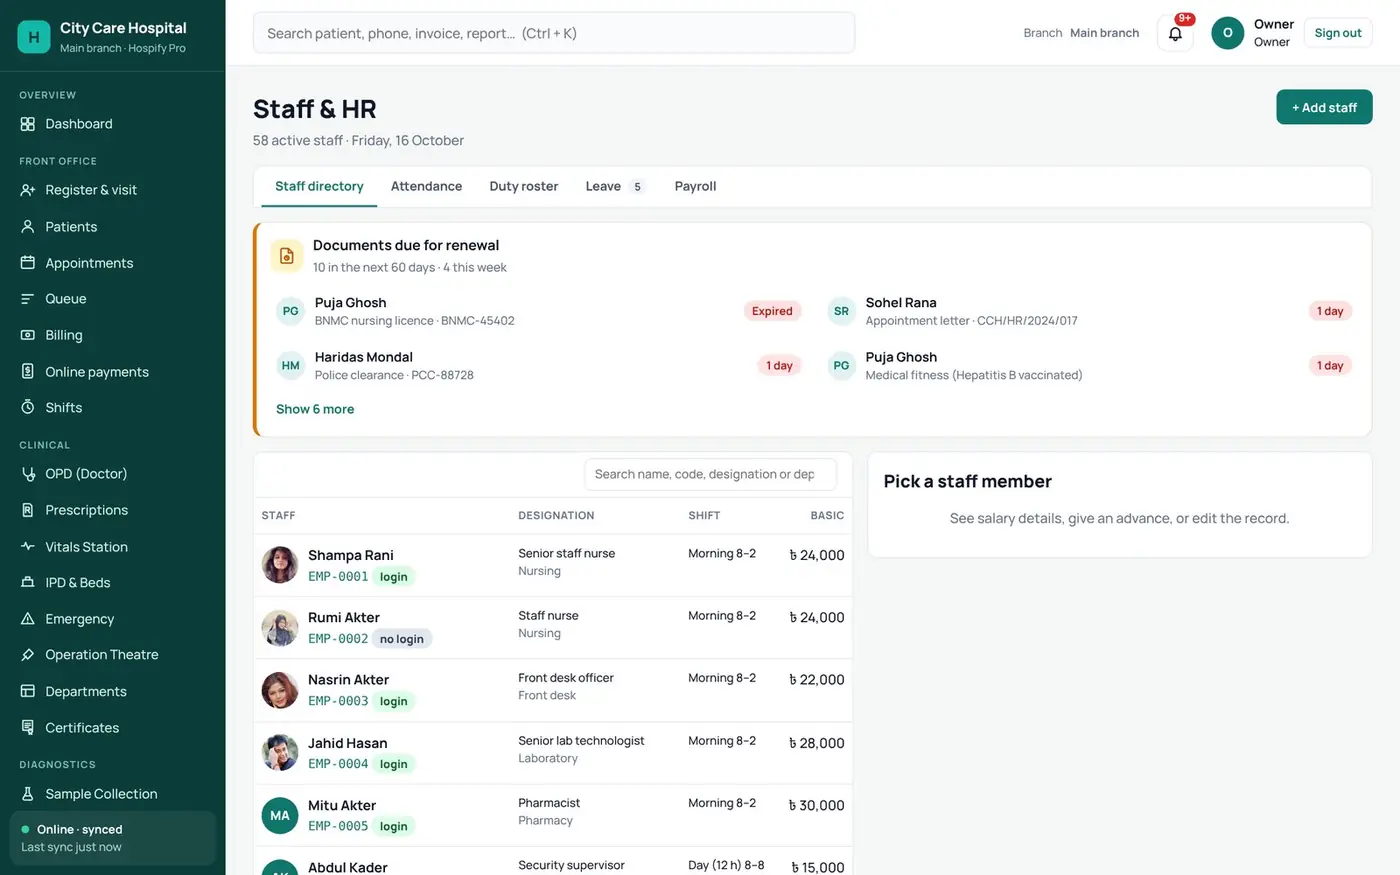
Staff and HR keeps the directory, attendance, duty roster, leave and payroll, and warns you before licences and documents expire.
- Directory · attendance · roster
- Leave and payroll
- Licence renewals
Step 33: Reports
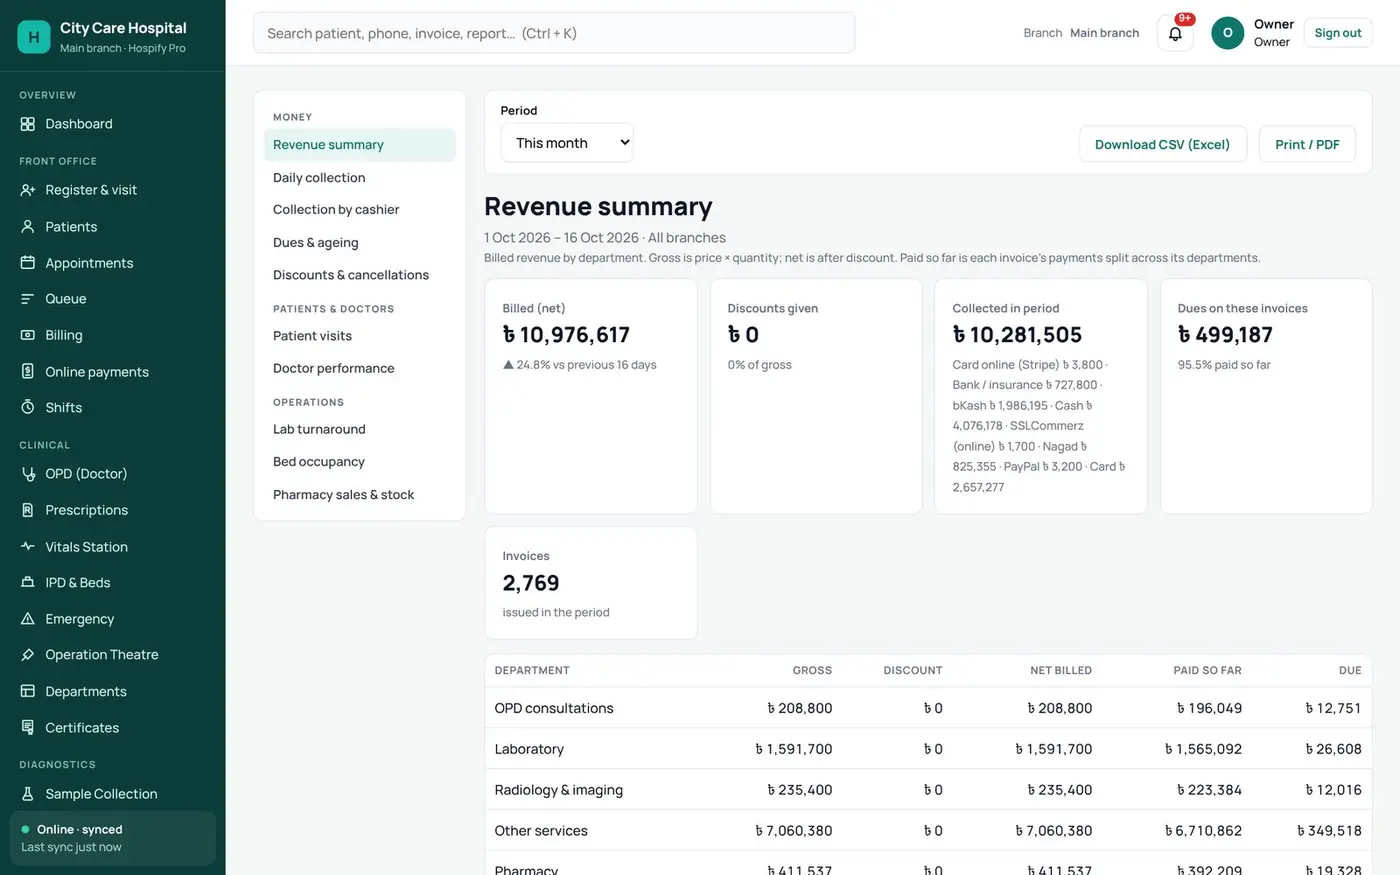
Finally, Reports and Analytics shows revenue, dues, doctor performance, bed occupancy and lab turnaround. Download any report as Excel or P D F.
- Revenue · dues · doctors
- Bed occupancy · lab turnaround
- Excel or PDF
Try it yourself
Open the live hospital demo, or start your free 14-day trial.
Tips and common questions
Can I try it before I sign up?
Yes. Open the [live hospital demo](/live-demo/?type=hospital) and click around with sample data. No sign-up is needed.
What if the internet goes down?
Hospify Pro keeps working offline. Your work carries on and everything syncs when the connection is back.
Who can see patient data?
Only your own staff, and each one sees only the screens their role allows. Every facility has its own private, encrypted database.
How do I get started?
Send a sign-up request at hospify.pro/signup. The first 14 days are free and no card is needed.
Where do I get help?
Open Help & support inside the software, or reach the Hospify Pro team on WhatsApp at +44 7782 256307 or at [email protected].
