

Once your Hospify Pro login arrives, you can set up your diagnostic centre and deliver your first verified lab report the same day. Add your name, logo and staff, check your test prices, add doctors and payment methods, then follow each patient from the front desk through sample collection, result entry, pathologist verification and report delivery.
In this guide 10 sections
- Video tutorial
- How one patient moves through your centre
- Part 1: Set up your new diagnostic centre
- Part 2: Set your tests, prices, doctors and payment methods
- Part 3: Register a patient
- Part 4: Create a test bill and print the receipt
- Part 5: Book an appointment or serial
- Part 6: Collect samples, enter results and verify
- Part 7: Deliver reports and close the day
- Tips and common questions
This guide walks owners, managers and front-desk staff through every step, using the real screens of the Hospify Pro diagnostic demo. You can follow along in the live diagnostic demo without signing up.
Who this is for: diagnostic centres and labs, with or without doctor chambers. What you need: a computer or tablet with a browser, and a thermal or A4 printer for receipts and barcode labels.
How one patient moves through your centre
- Appointment or walk-in. The patient books a serial online or comes to the counter.
- Front desk. Staff register the patient, add the tests and collect payment. The receipt prints.
- Sample collection. Paid tests appear here automatically. Staff confirm the patient, collect the tubes and stick on barcode labels.
- Laboratory. The technologist scans each tube in, enters results and sends the report for verification.
- Verification. The pathologist checks the values and locks the report.
- Delivery. The report is printed, sent on WhatsApp, or downloaded by the patient from the link on their receipt.
Part 1: Set up your new diagnostic centre
Setup takes about an hour once your login arrives. You do it once, and everything after that prints with your name and logo.
Step 1: Send a sign-up request
- Go to hospify.pro/signup.
- Under Your facility, choose Diagnostic centre / lab.
- Fill in the facility name, the web address you want (for example primelab.hospify.pro), your name, mobile/WhatsApp and email.
- Under Start with, choose sample patients to practise first, an empty database, or moving data from your current software.
- Press Send sign-up request.
The Hospify Pro team checks the request, sets up a private, encrypted database for your centre and sends your login, usually within one working day. The first 14 days are free and no card is needed.

Your account comes with lab tests, services, medicines and ICD-10/ICD-11 codes already loaded. You only set your prices.
Step 2: Add your centre’s name, logo and print header
Open Settings → Profile & printing.
- Check the Organisation name. You can add the name in Bangla too; it prints under the English name.
- Press Upload logo. A wide PNG with a transparent background works best (about 600 × 200 pixels, under 2 MB).
- Fill in Facility profile & print header: address, country, district, phone, email, website and your licence/registration line.
- Press Save profile.
These details print on every receipt, barcode slip and lab report.

Step 3: Add your staff and give them logins
Open Settings → Users & roles → + Add user.
- Type the person’s name and choose a username. Staff sign in with it.
- Choose their role. A diagnostic centre usually needs Receptionist, Cashier, Lab Technologist, Pathologist, Radiologist and Accountant.
- Hospify Pro creates a temporary password. Give it to the person; they change it the first time they sign in.
Each role sees only its own screens: a cashier sees billing, a lab technologist sees the laboratory. One person can hold two roles, for example Receptionist and Cashier.

If you run more than one location, add each one in Settings → Branches → + Add branch.
Part 2: Set your tests, prices, doctors and payment methods
The test list is already loaded, so this part is mostly checking prices and adding the doctors who sit at your centre.
Step 4: Check your test list and prices
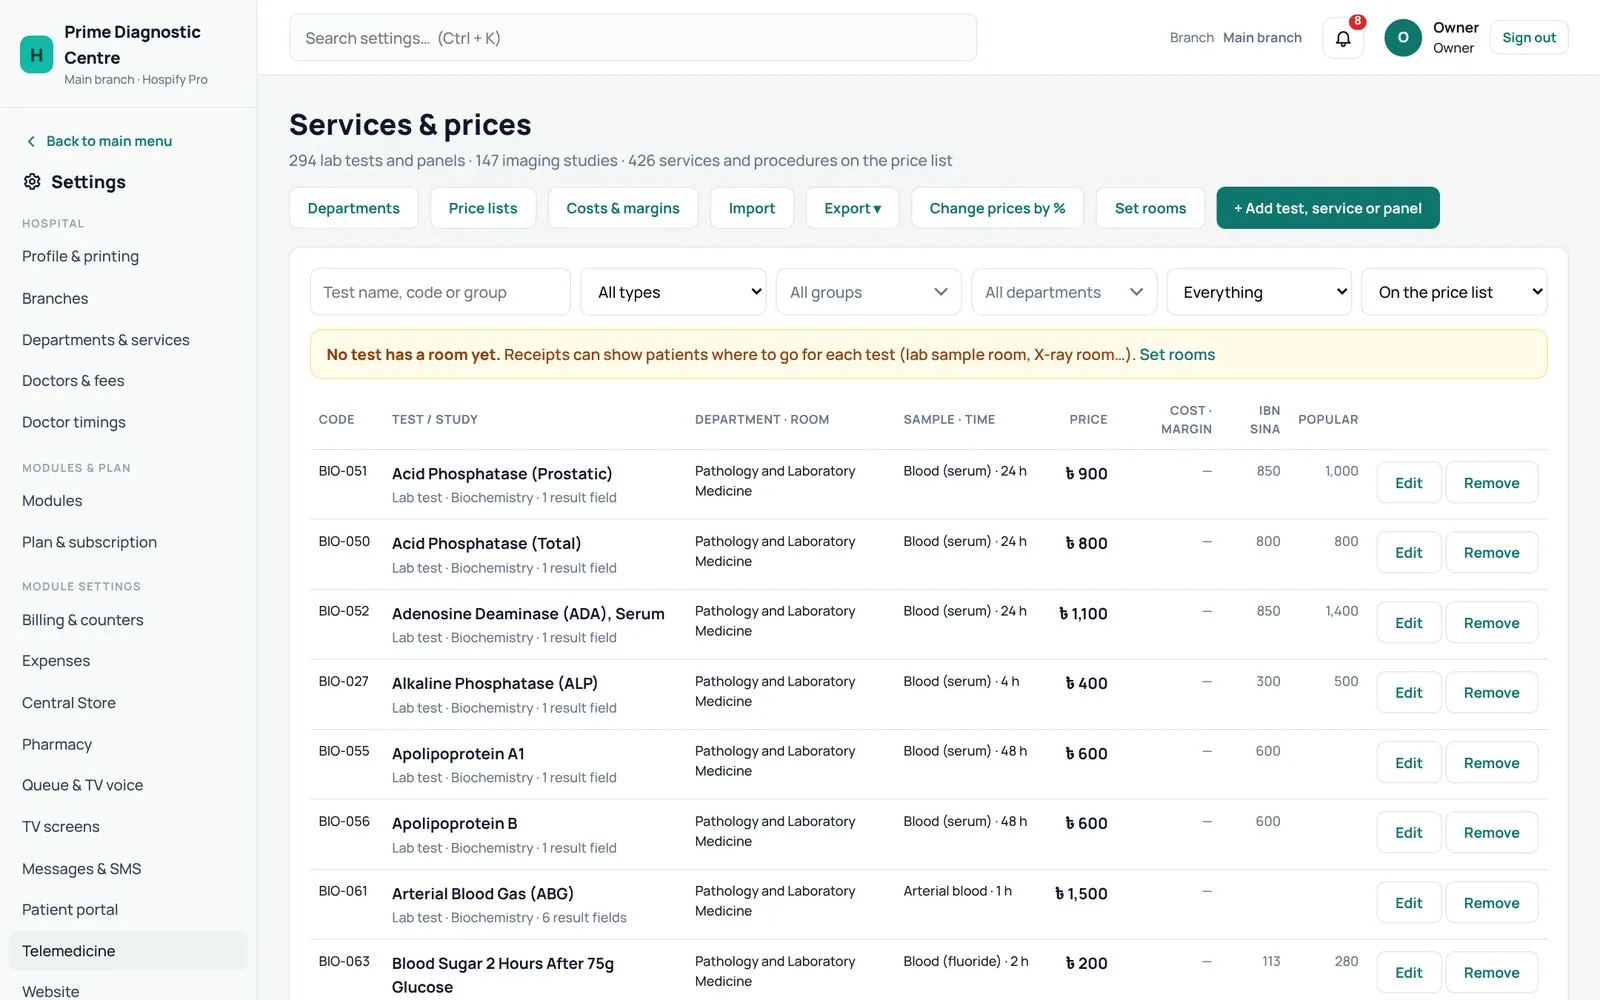
Open Settings → Services & prices. Each row shows the test code, department, sample type, report time and price.
- To change one price: press Edit on the row.
- To raise or lower all prices at once: press Change prices by %.
- To load your own price list from Excel: use Import. Use Export to download the current list first.
- To remove a test you don’t offer: press Remove. It stops appearing at the front desk.
Step 5: Add a new test (optional)
If a test is missing, press + Add test, service or panel and fill in:
| Field | What to enter |
|---|---|
| Type | Lab test, imaging, service or package |
| Code and name | The name exactly as it should print on bills and reports |
| Group and department | For example Biochemistry, Pathology |
| Room / counter | Where the patient goes; prints on the receipt |
| Price (৳) | Your price; cost per test is optional |
| Sample | Blood, urine, stool and so on |
| Report ready in (hours) | Sets the promised delivery time |
| Result fields and normal ranges | The values the technologist types in, with units and ranges |

For different prices for a company, an insurer or staff families, create one under Settings → Price lists → + New price list.
Step 6: Add your doctors and their chamber times
Open Settings → Doctors & fees → + Add doctor. Enter the name as it should print, department, room, serial letter (A, B…), new/old/report-check fees, degrees and BMDC number. Under Test commission, choose the hospital default rate, the doctor’s own rate, or off.

Then open Settings → Doctor timings, pick the doctor and add their weekly sessions. Appointments, the patient portal and your website only offer slots inside these times. Leave and hospital holidays are set here too.

To let a doctor see their own queue, press Give login next to their name in Doctors & fees.
Step 7: Choose payment methods and where patients pay
Open Settings → Currency & payment methods. Bangladesh centres start with Cash, bKash, Nagad, Card and Bank. Switch off the ones you don’t take, and tick Ask for reference / transaction no. for mobile payments.

Next, open Settings → Billing & counters and pick a Quick setup:
- Recommended: the front desk takes payment. The lab and imaging send their bills to the billing counter.
- Pay only at Billing: every desk sends bills to one counter, so the patient pays once.
- Every desk takes payment.
You can also choose Only chosen people to limit who can take cash at each desk.

Step 8: Set up referral commission (optional)
If outside doctors or marketing officers send you patients, open Commission → Settings. Switch on in-house doctors, outside doctors and marketing officers, then set the rates on the Rates tab. Commission is earned only as the patient pays, and unpaid bills are held.
Step 9: Turn on SMS (optional)
Open Settings → Messages & SMS and buy an SMS credit pack. One credit is one SMS to a Bangladeshi number (160 English or 70 Bangla characters). Booking confirmations, appointment reminders and due reminders then go out automatically.
Part 3: Register a patient
Every patient is registered once and gets a permanent UHID (patient ID). Their next visit starts from the same record, so their old reports and bills are always together.
Step 10: Search first, then register
Open Register & visit (the Front desk).
- Type the patient’s phone number, name or UHID in the search bar and press Find (or F4). You can also scan the QR code on an old slip or prescription.
- Returning patient: pick them from the results. Their details fill in by themselves.
- New patient: if the search shows not found — register below, type the Full name, choose Gender and enter the Age (years, months or days for babies).
- Press + More details only if you need them: blood group, NID/birth certificate, guardian, address, district, email, known allergies and emergency contact.

Always search by phone before registering. This stops the same person getting two UHIDs. If duplicates happen, open Patients, find both records and press Merge.
Part 4: Create a test bill and print the receipt
The bill is made on the same Front desk screen, right under the patient. One bill can hold a doctor’s fee, lab tests, imaging and services together.
Step 11: Add the tests
- Under What for, press Tests. If the patient is only here for tests, press No doctor (tests / services only).
- Tap a most used test (CBC, HbA1c, Lipid profile…) or type a test name or code in the search box. Packages appear here too.
- Each test is added as a line with its rate. Change the quantity or line discount if needed, or remove a line with ×.
Step 12: Take payment
In Bill & pay on the right:
- Referral doctor / agent: pick the outside doctor or marketing officer who sent the patient, or leave None · self / walk-in. This decides who earns commission.
- Bill discount: pick a saved discount (for example Senior citizen 10%) and, for special rates, a Price list.
- Choose Full, Part now or Due.
- Choose the method: Cash, bKash, Nagad, Card, Bank or Split across two methods. For cash, type the amount received and the change shows by itself.
- Press Collect & print (or F9). If the patient will pay at the billing counter, press Save without payment.

The invoice number is created when you save, and the receipt prints in A4, A5 or 80 mm thermal size. The receipt carries a QR code so the patient can check the bill and download their report later.
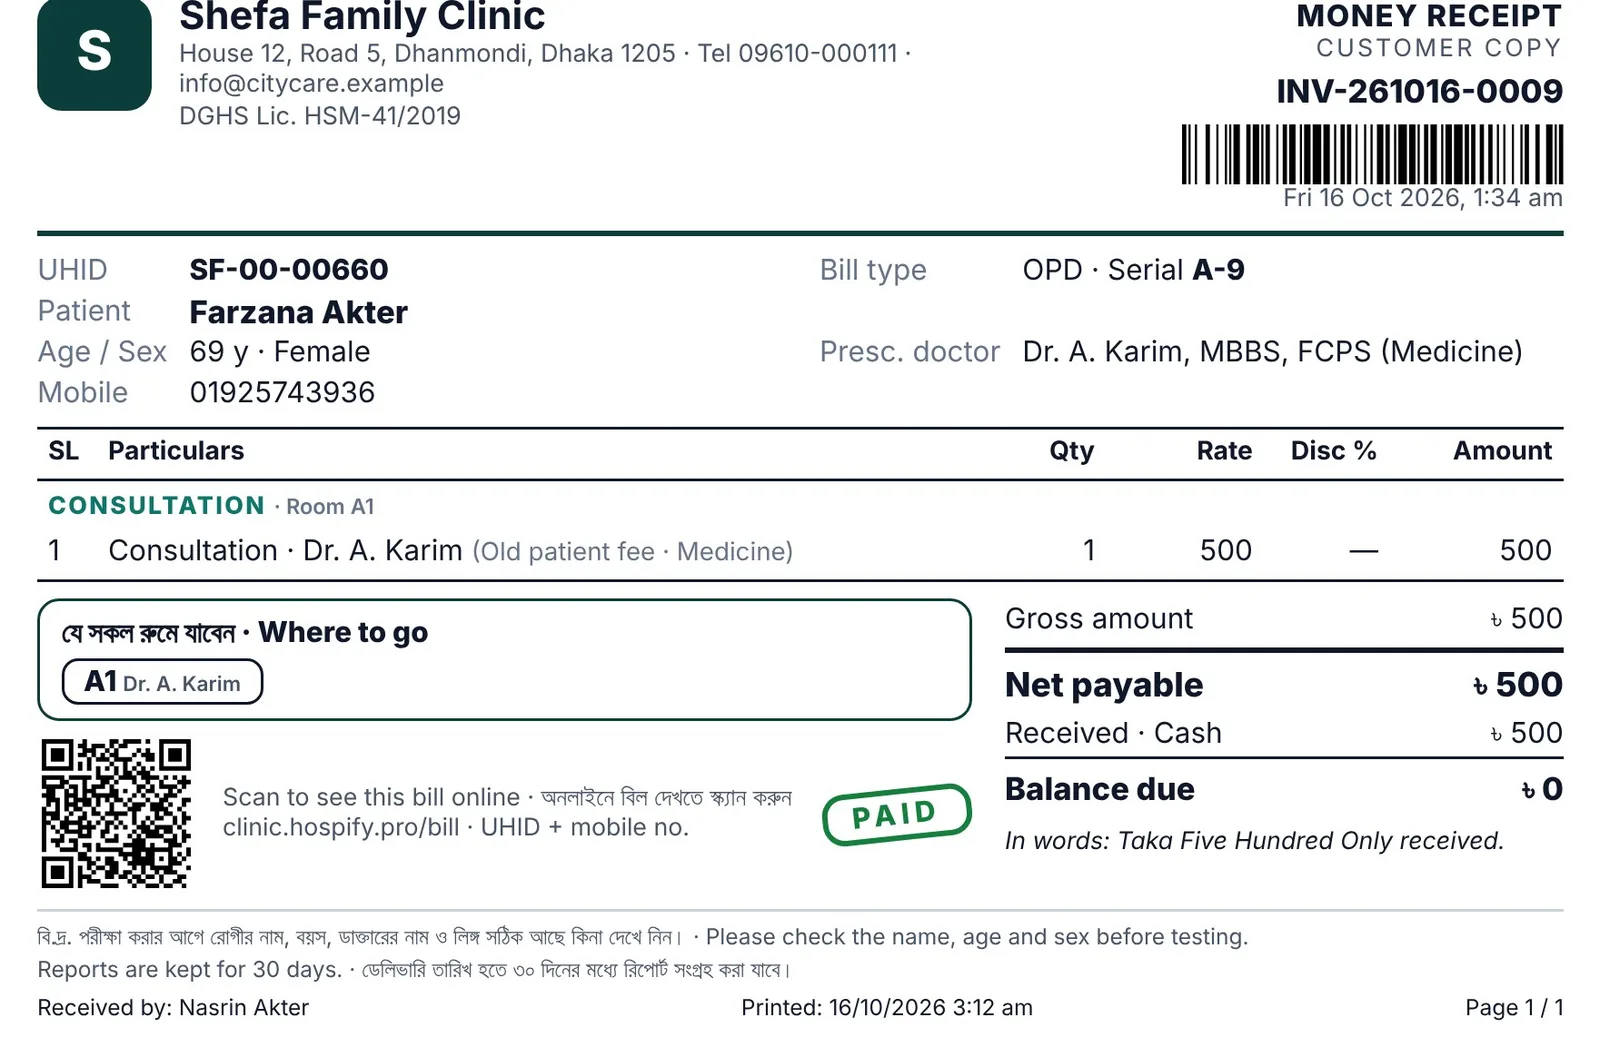
Once a lab test is paid, it goes straight to Sample Collection. Nobody has to send it by hand.
Collecting dues and refunds
- Dues: open Billing → Dues to collect, find the bill and press Collect.
- Refund or cancel: open the bill in Billing, choose Refund, pick the lines and type the reason. A credit note prints automatically. Refunds above the limit in Billing settings need an Owner or Admin.
Part 5: Book an appointment or serial
If doctors sit at your centre, patients can book a serial at the counter, by phone or online. Booking only works for doctors who have chamber times set (Step 6).
Step 13: Book at the counter or by phone
- Open Appointments and press + New appointment.
- Find the patient by name, phone or UHID, or press New patient.
- Choose the Doctor. Their days, hours and free places appear.
- Choose the Visit type (New, Old / follow-up or Report check) and add a note if needed.
- Pick a day and a time or serial, then press Book appointment.

With SMS turned on (Step 9), the patient gets a booking confirmation with their serial number, and a reminder before the visit.
Online booking
Patients can also book from your Hospify Pro website or patient portal. These use the same doctor timings and serials as the counter. An online booking that is not paid keeps its serial for a limited time, then the serial is released.
On the day
- Click a booking in Appointments to check the patient in, reschedule, cancel or print a token.
- Fees and the referral doctor are handled on the bill at the Front desk, not on the appointment.
- Patients who don’t come are marked no-show automatically 60 minutes after their time.
- The Queue screen shows who is waiting for each doctor, and can call the next patient on a TV display with a voice announcement.
Part 6: Collect samples, enter results and verify
Paid lab tests move through three screens: Sample Collection, Laboratory and Verify. Each step records who did it and when.
Step 14: Collect the sample and print barcode labels
Open Sample Collection. Every patient whose lab tests are paid is waiting here, with the number of tubes needed.
- Scan the patient’s bill, type their UHID, or click their name in the list.
- Confirm the patient with two identifiers. Ask the patient to say their full name and age or date of birth. Do not read it to them. Match it with the bill, then tick both checks.
- Collect the containers shown on screen, one per cap colour. For example, a grey-top fluoride tube for blood sugar and a red/gold-top serum tube for lipid profile and SGPT. Handling notes such as invert 8–10 times or let it clot 30 min are shown with each tube.
- Press Collected · print labels. Stick each label on its tube in front of the patient. Never pre-label empty tubes.
Label sizes 50×25, 38×25 and 60×40 mm are supported.

Step 15: Receive the sample and enter results
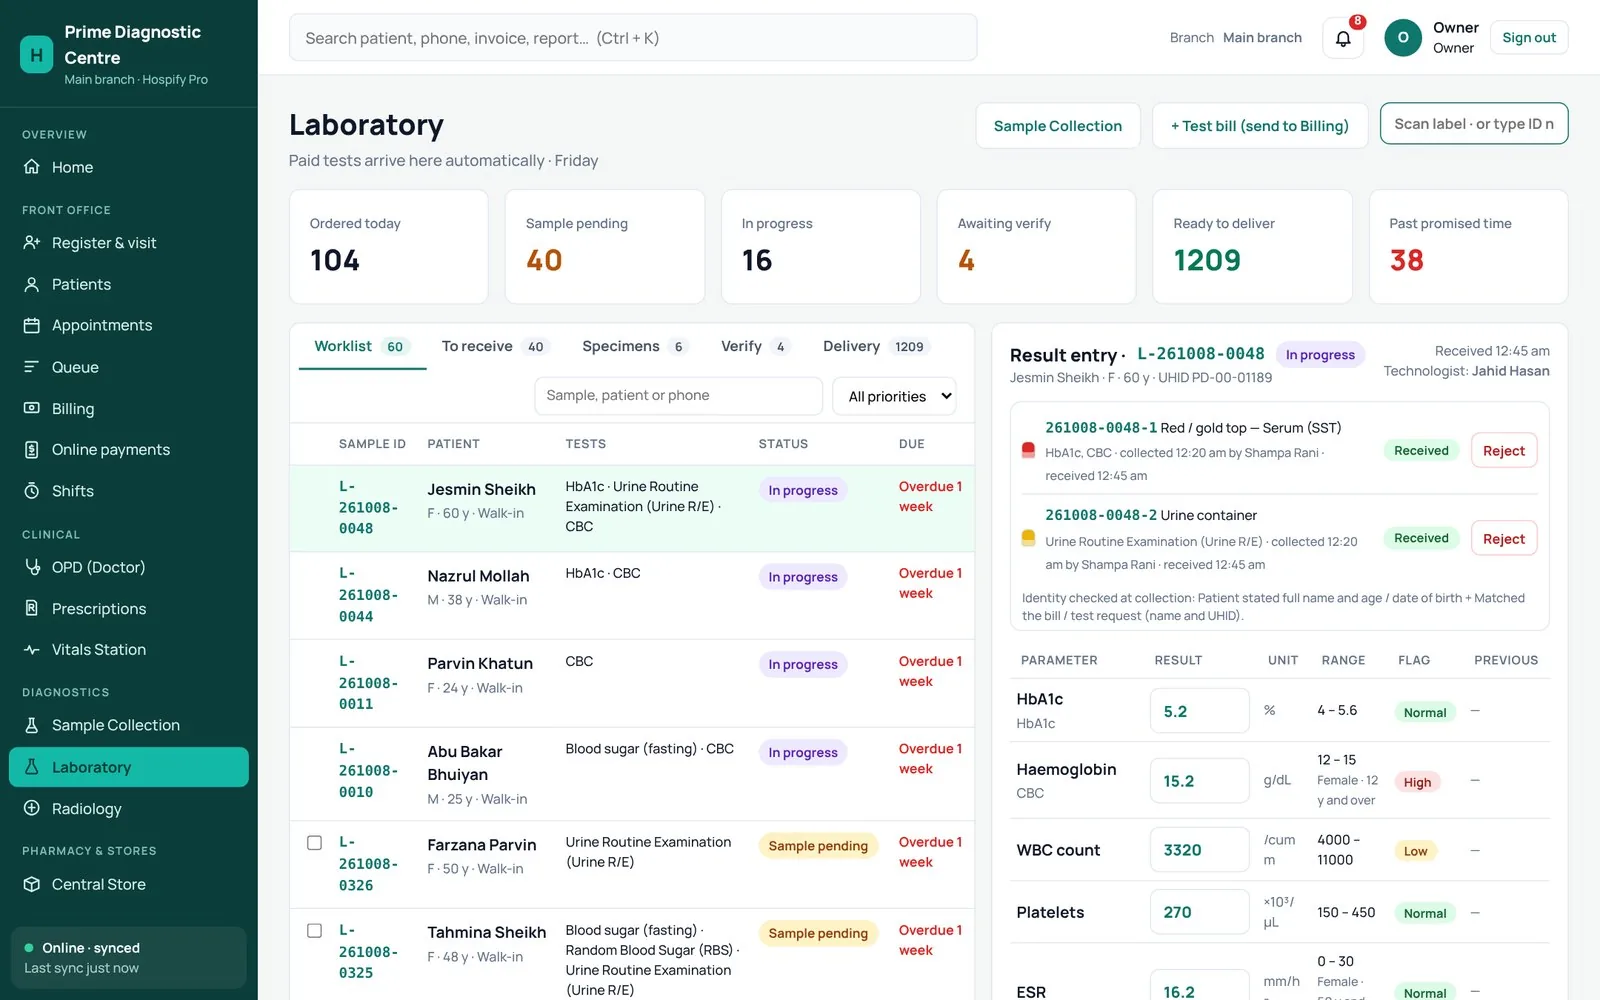
Open Laboratory. The Worklist shows every sample with its status and due time; overdue ones are marked.
- Scan the tube’s barcode (or type the ID printed on it) to receive it. A sample in bad condition can be rejected and sent back for recollection.
- Open the sample and type each result. The unit, normal range and the patient’s previous value are shown on the same line.
- Values outside the range are flagged High or Low automatically, using the ranges for the patient’s age and sex.
- Add a comment if needed (it prints on the report), then press Send for verification. Use Save draft if results are not complete yet.
Step 16: Pathologist verifies and locks the report
The pathologist opens Laboratory → Verify, picks the sample and checks the values and flags.
- Verify & lock: the report is locked and prints with the pathologist’s name. Any later change needs an amended report.
- Return to technologist: sends it back if something needs rechecking.

A report cannot be delivered until it is verified. This keeps an unchecked result from reaching a patient.
Part 7: Deliver reports and close the day
Step 17: Deliver the report
Open Laboratory → Delivery. Every verified report is listed here. Open one and choose how the patient gets it:
- Print report: prints on your letterhead with the pathologist’s name.
- Send on WhatsApp: sends the report PDF to the patient’s number.
- Mark delivered: records that the patient collected it.
The patient can also download the report themselves from the link on their receipt.

Step 18: Close the cashier shift
Ask each cashier to work inside a shift so the cash in the drawer always matches the software.
- At the start of the day, open Shifts → Open my shift, type the opening float and choose the counter.
- Collect payments as usual.
- At handover, count the cash. Hospify Pro shows the expected cash, the counted cash and any difference, and keeps a handover print.

Step 19: Check the day’s reports
Open Reports & Analytics. Pick a period and press Apply.
| Report | What it tells you |
|---|---|
| Revenue summary | Billed, discounts, collected and due, by department |
| Daily collection | Money in by day and by payment method (cash, bKash, card…) |
| Collection by cashier | What each cashier took |
| Dues & ageing | Who still owes money, and for how long |
| Discounts & cancellations | Every discount and cancelled bill |
| Doctor performance | Patients and revenue per doctor |
| Lab turnaround | How long reports take against the promised time |
Every report can be downloaded as CSV (Excel) or printed as PDF.

Tips and common questions
What should I do on day one?
Do steps 1 to 3 and step 7, then register one test patient and run them all the way to delivery. This is the quickest way for your staff to learn the full flow.
What if the internet goes down?
Hospify Pro keeps working offline. Registration, billing and lab work carry on, and everything syncs when the connection is back.
Who can see patient data?
Only your own staff, and each one sees only the screens their role allows. Every centre has its own private, encrypted database.
Can a lab test start before the bill is fully paid?
Yes. In Settings → Billing & counters, tick “Start the work before the bill is fully paid” for the Laboratory desk.
Can I print in Bangla?
Yes. Add your centre's Bangla name in Profile & printing; it prints under the English name.
Where do I get help?
Open Help & support inside the software for short guides, or raise a support ticket. You can also reach the Hospify Pro team on WhatsApp at +44 7782 256307 or at [email protected].
