


Once your Hospify Pro login arrives, you can set up your chamber in about 30 minutes. Choose your chamber type, add your fees, chambers and weekly sitting times, then your assistant registers patients and takes the fee, and you write each prescription on screen and print it on your own letterhead. Every patient's history stays together across all your chambers.
In this guide 6 sections
This guide is for doctors who run their own chamber, or sit in one to three chambers with an assistant. It uses the real screens of the Hospify Pro chamber demo. You can follow along in the live chamber demo without signing up.
Who this is for: general physicians and specialists in private practice, and their assistants. What you need: a computer, tablet or phone with a browser, and an A4 or A5 printer for prescriptions.
How one patient moves through your chamber
- Serial. The patient books online, calls your assistant, or walks in. They get a serial number, for example M-6.
- Front desk. Your assistant finds or registers the patient, takes the fee and prints the slip.
- Waiting. The patient waits; the queue screen and your OPD screen both show the line.
- Consultation. You press Call next patient, write the prescription and press Finish & print.
- After the visit. The prescription goes to the patient’s WhatsApp, and a follow-up reminder goes out by SMS before the next visit.
Part 1: Set up your chamber
You do this once. Everything after this prints with your name, degrees and chamber details.
Step 1: Send a sign-up request
- Go to hospify.pro/signup.
- Under Your facility, choose Doctor’s chamber. Dentists choose Dental chamber and eye specialists choose Eye chamber.
- Fill in the chamber name, the web address you want (for example drhasan.hospify.pro), your name, mobile/WhatsApp and email.
- Press Send sign-up request.
The Hospify Pro team sets up a private, encrypted database for your chamber and sends your login, usually within one working day. The first 14 days are free and no card is needed.
Step 2: Check your chamber type, name and logo
Open Settings → Profile & printing.
- Chamber type: choose General doctor, Dental or Eye. This decides your prescription screen. A dental chamber gets the tooth chart and treatment plan; an eye chamber gets vision, eye pressure and the glasses prescription. You can change it later.
- Organisation name: your chamber’s name as it should print. Add the Bangla name too if you like.
- Logo: press Upload logo (optional). Most doctors’ prescriptions look best with just the name.
- Fill in the address, phone and email for the print header and press Save profile.

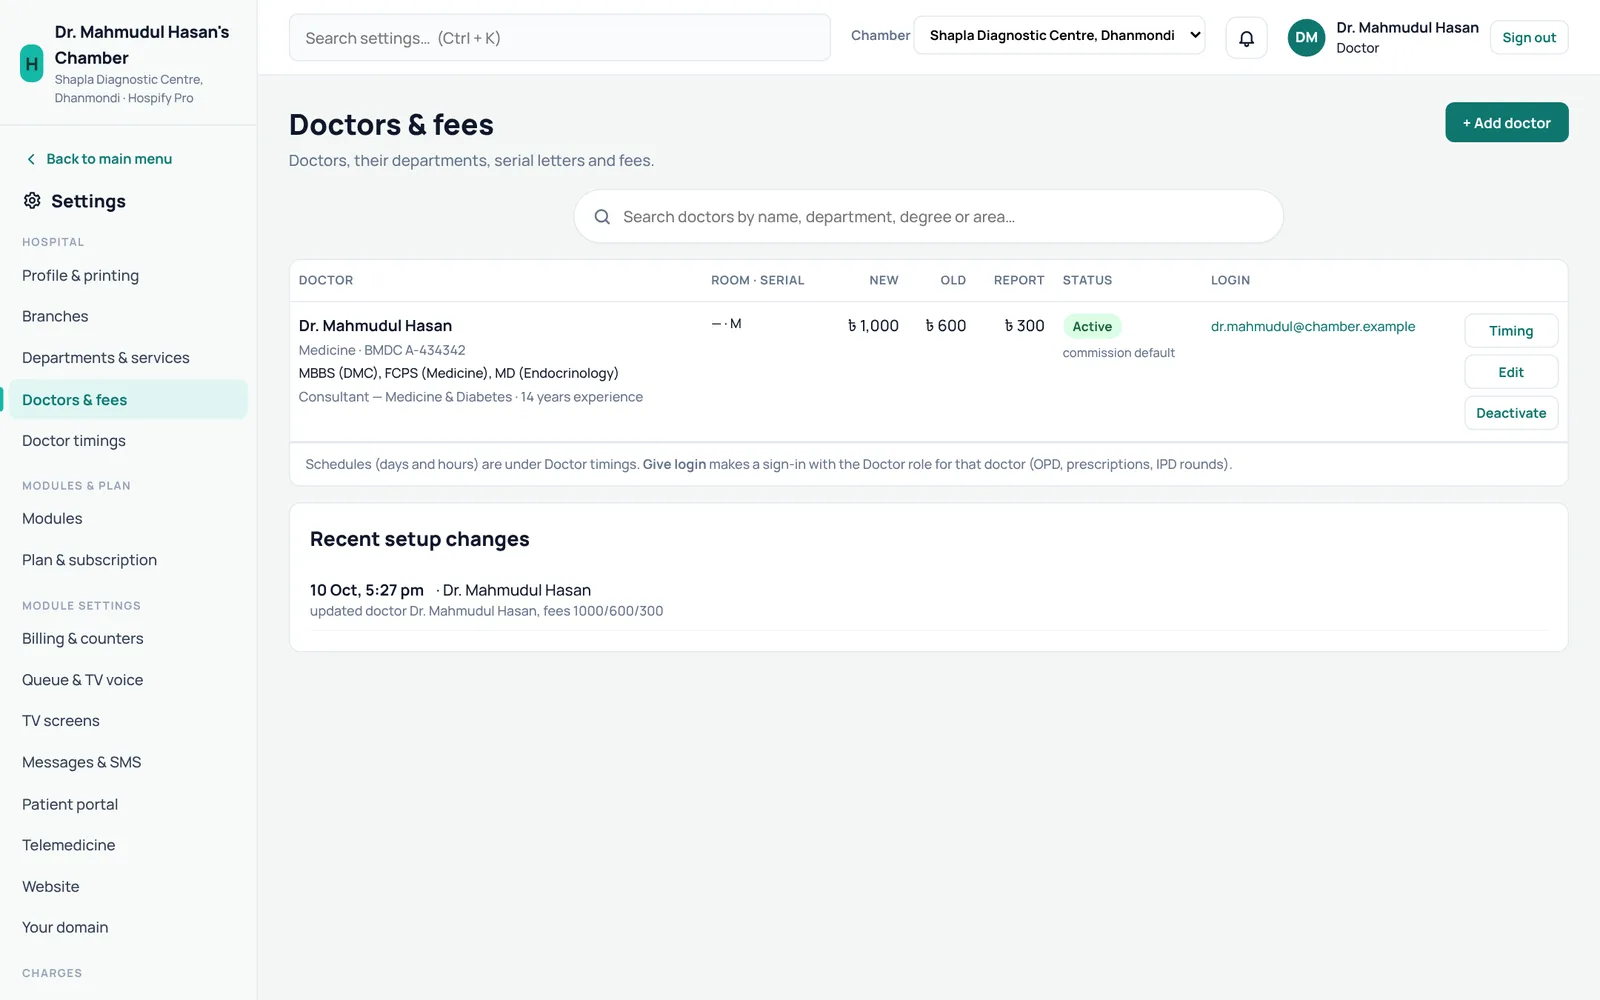
Step 3: Set your fees, degrees and BMDC number
Open Settings → Doctors & fees and press Edit on your name.
- Fees: new patient, old (follow-up) patient and report check. The front desk picks the right fee by itself from the patient’s last visit.
- Degrees and designation: exactly as they should print, for example MBBS (DMC), FCPS (Medicine).
- BMDC number, special interests and experience: these print on the prescription and show on your public booking page.
Step 4: Add your chambers
If you sit in more than one place, open Settings → Branches → + Add branch and add each chamber, for example Own chamber, Uttara and Shapla Diagnostic Centre, Dhanmondi. The Chamber plan includes up to three.
Use the Chamber switch at the top of the screen to move between them. Serials and collections are kept per chamber; patients and their history are shared.

Step 5: Add your weekly sitting times
Open Settings → Doctor timings and pick your name.
- Add a session for each day you sit: start and end time, the chamber, and the most patients you see in it. Press Edit on a block to change it.
- Choose Serial numbers (patients get M-1, M-2…) or Time slots (patients get a time).
- Add leave and holidays on the Leave tab. Bookings are blocked on those days.
Your booking page, the patient portal and the front desk only offer serials inside these times.

Step 6: Give your assistant a login
Open Settings → Users & roles → + Add user, type your assistant’s name and username, and choose the role Receptionist. The Chamber plan includes two assistant logins. Each assistant changes the temporary password the first time they sign in.
To send booking confirmations and follow-up reminders by SMS, open Settings → Messages & SMS and buy a credit pack.
Part 2: Your day in the chamber
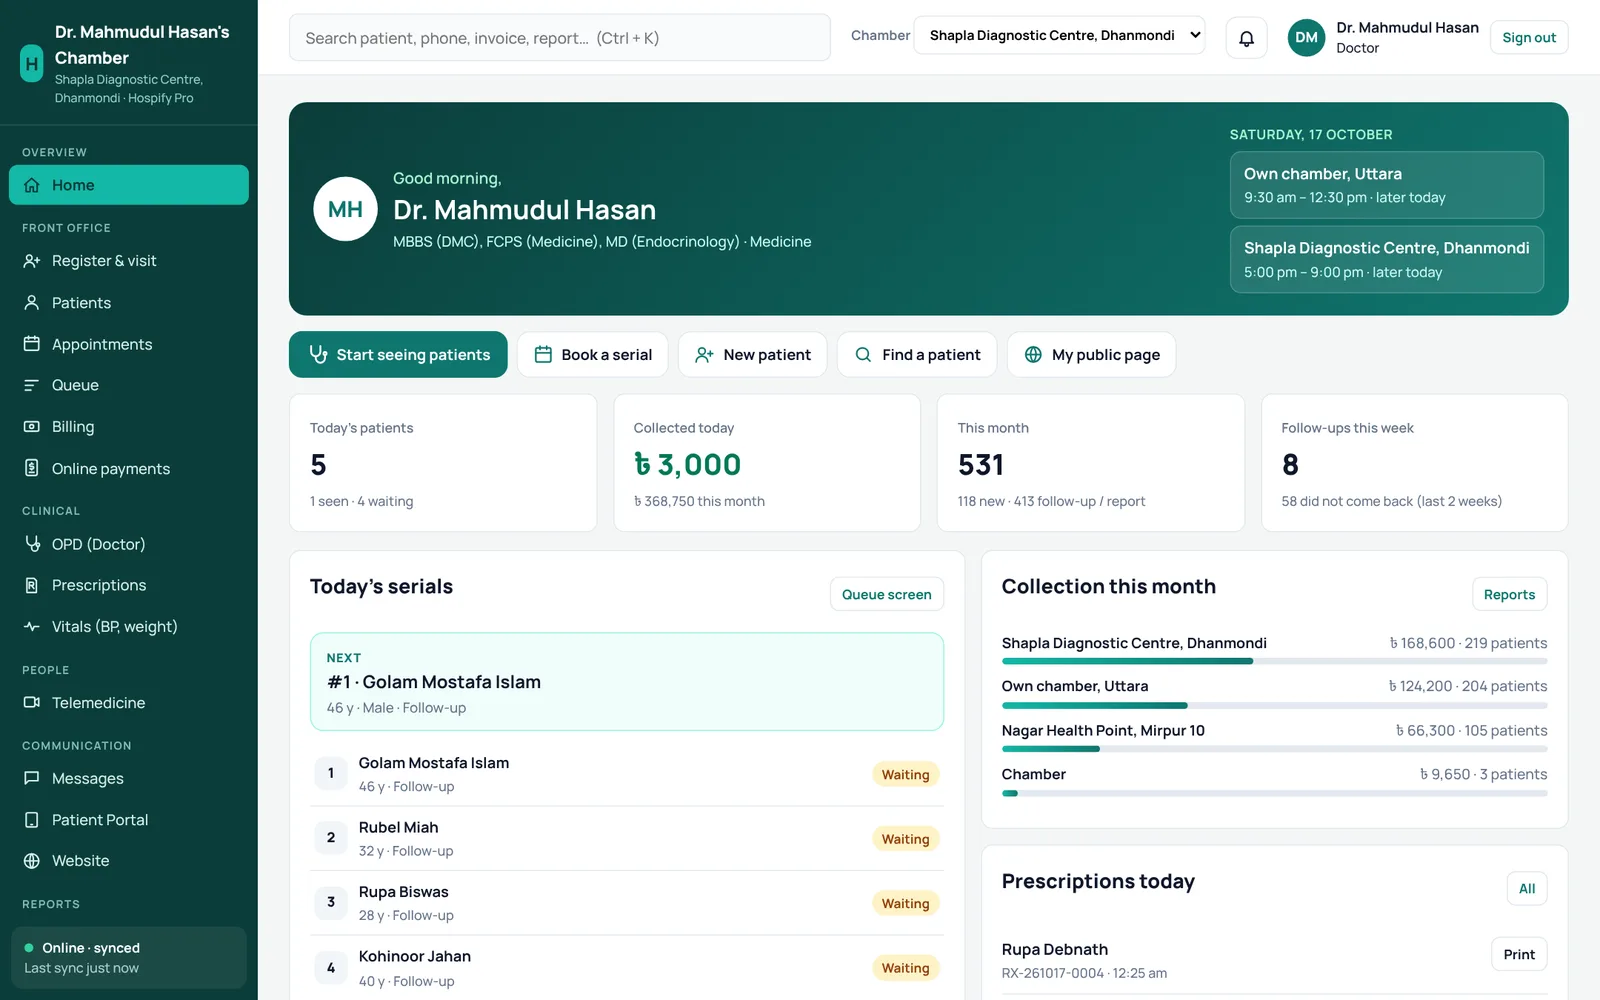
Step 7: Start from your home page
When you sign in, your home page shows today’s chambers and times, how many patients are booked and waiting, today’s collection, follow-ups due this week, and today’s prescriptions with a Print button.
Press Start seeing patients to open your consultation screen.
Step 8: Book serials (assistant)
Open Appointments. Each of your sessions shows how many are booked, how many are in the queue and how many places are free. Press + Book, find the patient by phone and pick the serial or time.
Patients can also book themselves from your public page. Online bookings that are not paid keep their serial for a limited time, then the serial is released.

Step 9: Register the patient and take the fee (assistant)
Open Register & visit (the Front desk).
- Type the patient’s phone number, name or UHID and press Find. You can also scan the QR code on an old prescription.
- Returning patient: pick them. New patient: type the name, gender and age.
- Under What for, the doctor is already chosen. The screen shows the next serial and its expected time, and the fee for a new or old patient.
- Choose how the patient pays (Cash, bKash, Nagad, card…) and save. The slip prints with the serial number.

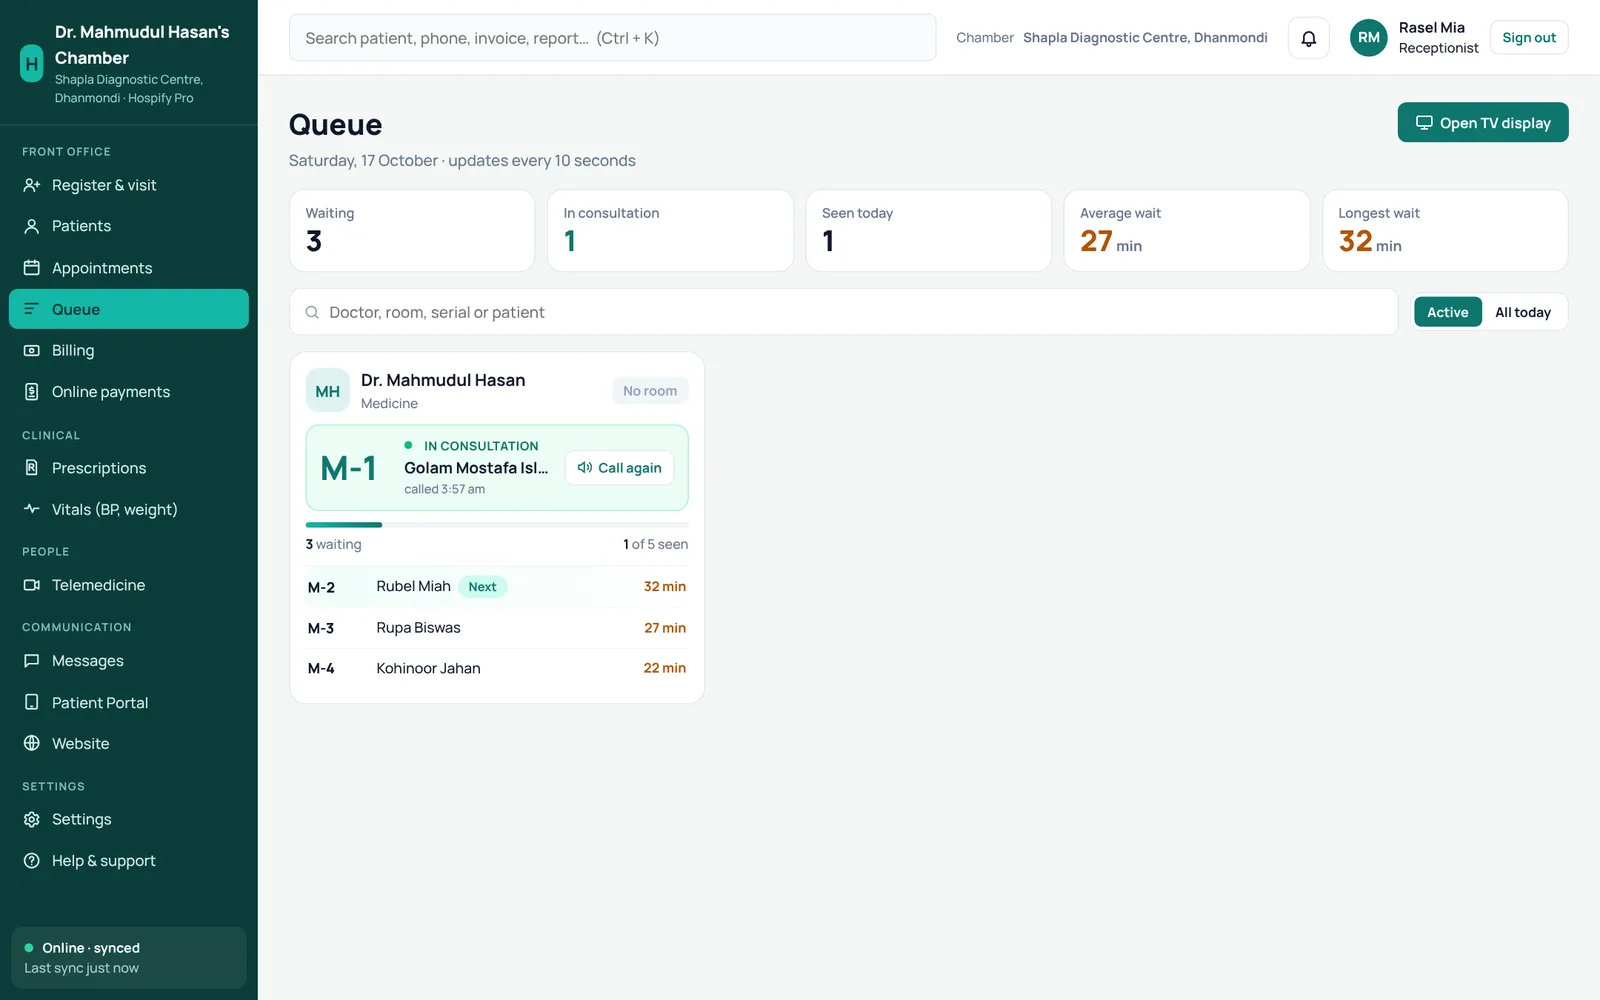
Step 10: Watch the line
Open Queue to see who is in consultation, who is next and how long each patient has waited. Press Open TV display to show the serials on a screen in the waiting room, with voice calling in Bangla and English.
Step 11: See the patient and write the prescription
Open OPD (Doctor) and press Call next patient. The bar at the top tells you how many are waiting, about how long it will take to see them all, and the longest wait.
- On the left: the patient’s details, long-term conditions and vitals your assistant took.
- Type the chief complaint and findings.
- Diagnosis: search ICD-10 by words, short forms (HTN, DM) or code, or tap one of your common diagnoses.
- Prescription: type a medicine by brand or generic name. Set the dose (for example 1+0+1), days and timing. Instructions print in Bangla or English; press বাংলা or English.
- Use Repeat last to copy the previous prescription, ★ My favourites and Templates for medicines you use often, or ✍ Write by hand to write with a stylus.
- Add advice (suggestions appear for the diagnosis) and the follow-up.
The allergy and interaction check runs as you add each medicine.

Step 12: Finish, print and send
Press Finish & print prescription (or F9). The prescription prints on your letterhead with your degrees, the chamber times, a QR code anyone can scan to check it is real, and your signature.
If the patient’s phone is on file, the prescription can go to them on WhatsApp too. The follow-up date is saved, and a reminder goes out before it if SMS is on.

Made a mistake after finishing? Open the prescription and press Amend prescription, pick a reason and correct it. The number stays the same and the print says Amended.
Part 3: Grow your chamber
Step 13: Share your booking page
Press My public page on your home page. Patients see your degrees, chamber hours, fee and the next free serials, and book in a few taps. Share the link on Facebook, Google Maps and your visiting card.

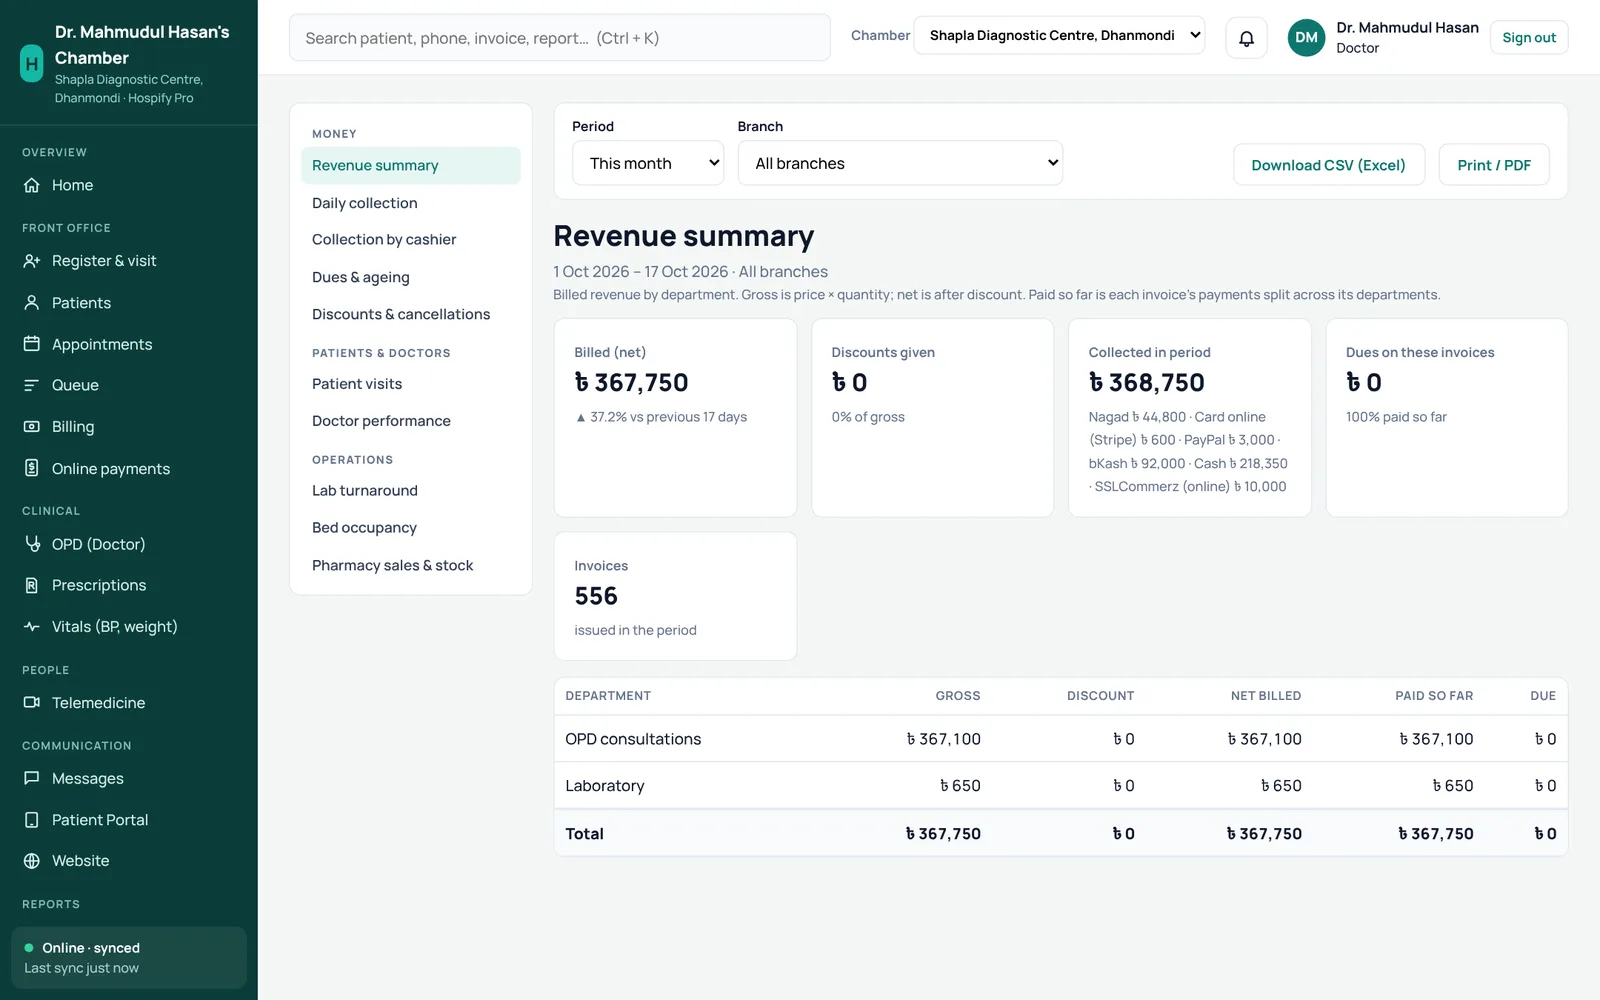
Step 14: Check your income and follow-ups
Open Reports → Revenue summary to see what you billed and collected this month, by payment method and by chamber. Doctor performance shows patients seen and fees, and Daily collection is the close-of-day report for your assistant.
On your home page, Follow-ups this week shows who is due back and how many did not come back in the last two weeks, so your assistant can call them.
Next steps
- Dentists: read the dental chamber guide for the tooth chart and treatment plans.
- Eye specialists: read the eye chamber guide for vision, eye pressure and the glasses prescription.
- Busy chambers: read the phone view & writing by hand guide to repeat a prescription in one tap.
Tips and common questions
What should I do on day one?
Do steps 1 to 5, then ask your assistant to register one test patient and write their prescription yourself. Print it and check your letterhead. That is the whole daily flow.
I sit in three different chambers. Do I need three accounts?
No. The Chamber plan covers up to three chambers in one account. Each chamber has its own sitting times, serials and collection, and every patient's history is together under your name.
Can my assistant see my fees and reports?
Your assistant signs in as a Receptionist. They see the front desk, appointments, queue and billing, but not your settings or the full reports.
I am a dentist or an eye specialist. Is this guide for me?
Yes. Everything here applies to you. Choose Dental or Eye in step 2, then read the dental chamber or eye chamber guide for the extra parts of your prescription screen.
Can I write the prescription on my phone?
Yes. Open the phone view to see your line, call the next patient and repeat a returning patient's prescription in one tap. See the phone view & writing by hand guide.
What if the internet goes down?
Hospify Pro keeps working offline. Serials, fees and prescriptions carry on, and everything syncs when the connection is back.
Where do I get help?
Open Help & support inside the software, or reach the Hospify Pro team on WhatsApp at +44 7782 256307 or at [email protected].
